ラズピコはマルチコアになっていて、MicroPythonでもマルチコアを使えるけれど、実行速度考えたらArdunino言語を使った方が高速だろうから、
https://ameblo.jp/pta55/entry-12798012318.html
で見つけたやり方を参考に、Lチカアプリをマルチコア使って他のコアにメッセージを送ってみた
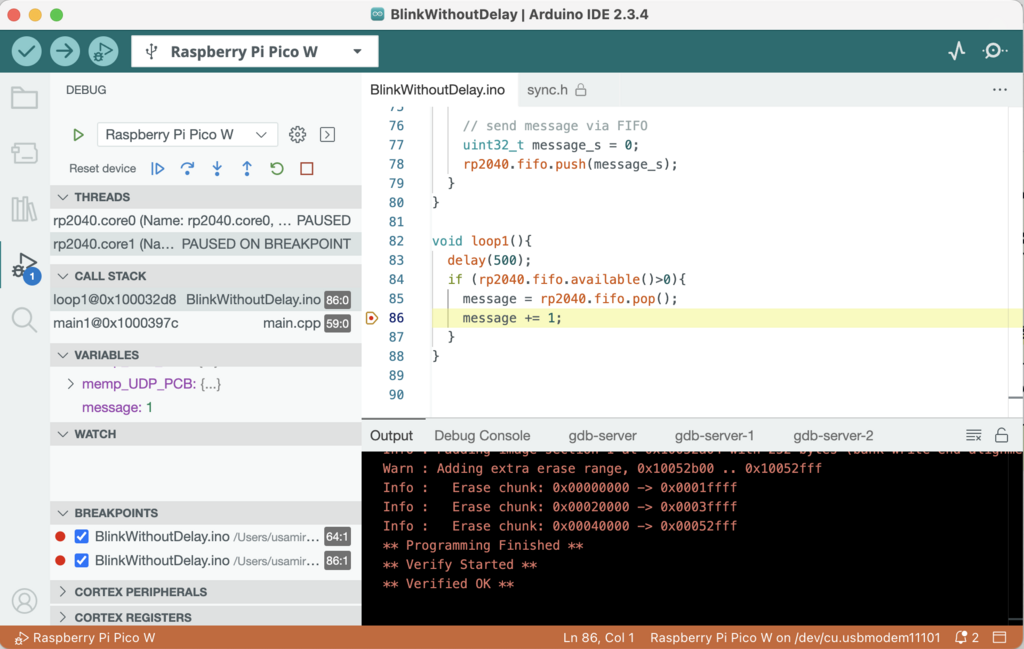
ここでは固定値message_sをfifoで送信していますが、受信側で使われるglobal変数はloop1のfifo受信処理で書き換えられています(最初のブレークポイントではグローバル変数の初期値999ですが、その後のブレークでは1になります(fifoバッファーのデータ有無チェックしてるのに初期値になるのは変!)
https://arduino-pico.readthedocs.io/en/latest/multicore.html
には、
int rp2040.fifo.available()
Returns the number of values available to read in this core’s FIFO.
とありますが
// constants won't change. Used here to set a pin number:
const int ledPin = LED_BUILTIN;  // the number of the LED pin

// Variables will change:
int ledState = LOW;  // ledState used to set the LED

// Generally, you should use "unsigned long" for variables that hold time
// The value will quickly become too large for an int to store
unsigned long previousMillis = 0;  // will store last time LED was updated

// constants won't change:
const long interval = 500;  // interval at which to blink (milliseconds)

uint32_t message = 999;

void setup() {
  // set the digital pin as output:
  pinMode(ledPin, OUTPUT);
}

void setup1(){
}

void loop() {
  // here is where you'd put code that needs to be running all the time.

  // check to see if it's time to blink the LED; that is, if the difference
  // between the current time and last time you blinked the LED is bigger than
  // the interval at which you want to blink the LED.
  unsigned long currentMillis = millis();

  if (currentMillis - previousMillis >= interval) {
    // save the last time you blinked the LED
    previousMillis = currentMillis;

    // if the LED is off turn it on and vice-versa:
    if (ledState == LOW) {
      ledState = HIGH;
    } else {
      ledState = LOW;
    }

    // set the LED with the ledState of the variable:
    digitalWrite(ledPin, ledState);

    // send message via FIFO
    uint32_t message_s = 0;
    rp2040.fifo.push(message_s);
  }
}

void loop1(){
  if (rp2040.fifo.available()>0){
    message = rp2040.fifo.pop();
    message += 1;
  }
}
マルチコアの使い方は、
① コアごとの動作はsetup/setup1、loop/loop1で指定する
② コアプロセス間の通信はfifo(rp2040.fifo)を使って行う、データ幅は4バイトで長さは8らしい(ソフト的なfifoなら任意に設定できるはずなのでこれはハードレジスタ)、受信するデータはglobal変数で定義しないといけない、送信側はlocal変数でもglobal変数でも大丈夫
デバッガで動かしてみると、マルチコア動作が確認できるのと、sync.hなるファイルが自動で生成されています、これはステップイン機能(停止したポイントの関数の中も追える)ですね
画面を見ればわかるようにコア二個分のデバッグ情報を見ることができます
admin

