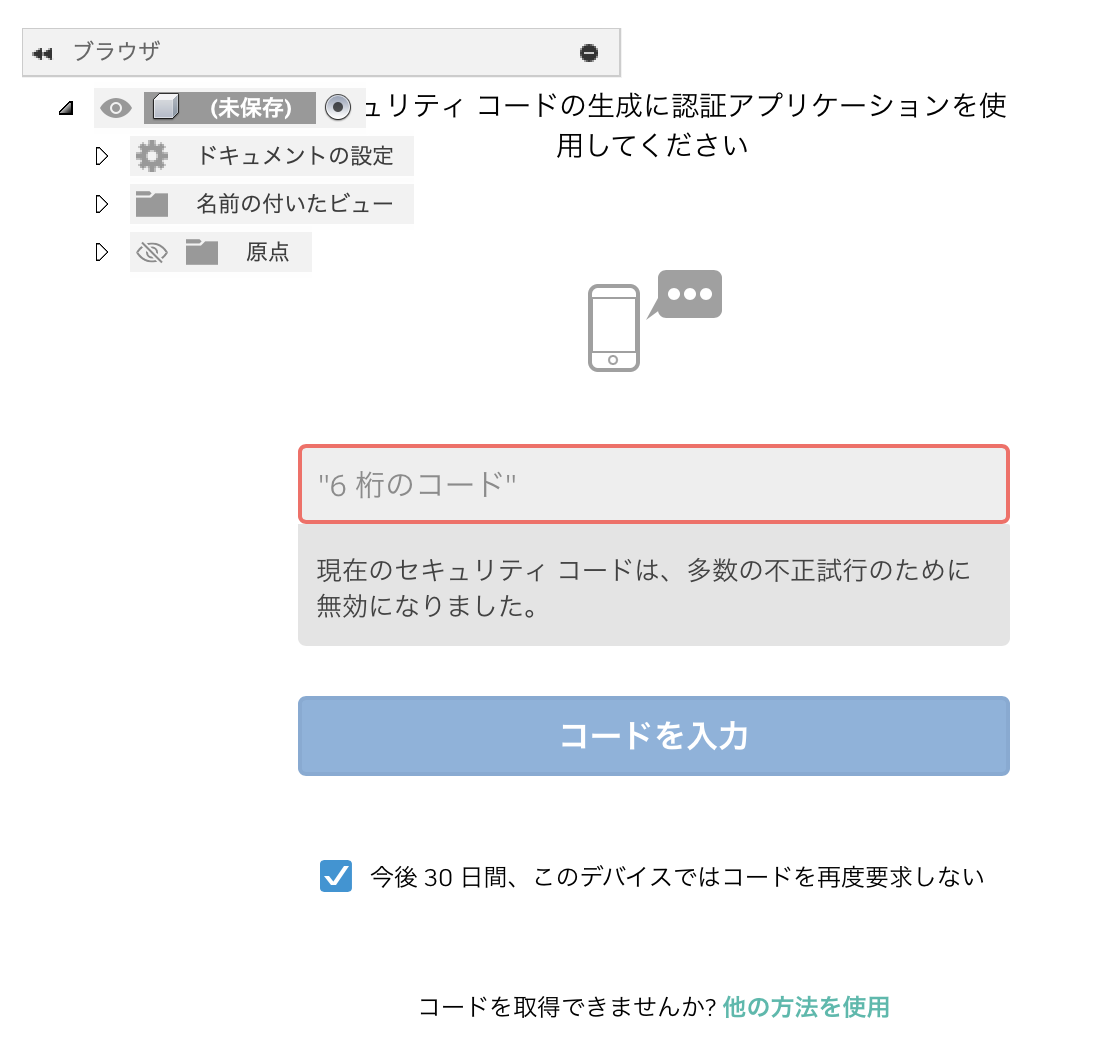
久々にログインしようとしたら、6桁の認証コード作成ではうまくいかない。メッセージの通り、使えなくなったようです。『多数の不正試行』て誰のせい?
代替え手段として”他の方法を使用”をクリックするとメールで認証コード送ってくれるのでこれで対応。
admin

la vie libre
久々にログインしようとしたら、6桁の認証コード作成ではうまくいかない。メッセージの通り、使えなくなったようです。『多数の不正試行』て誰のせい?
代替え手段として”他の方法を使用”をクリックするとメールで認証コード送ってくれるのでこれで対応。
admin
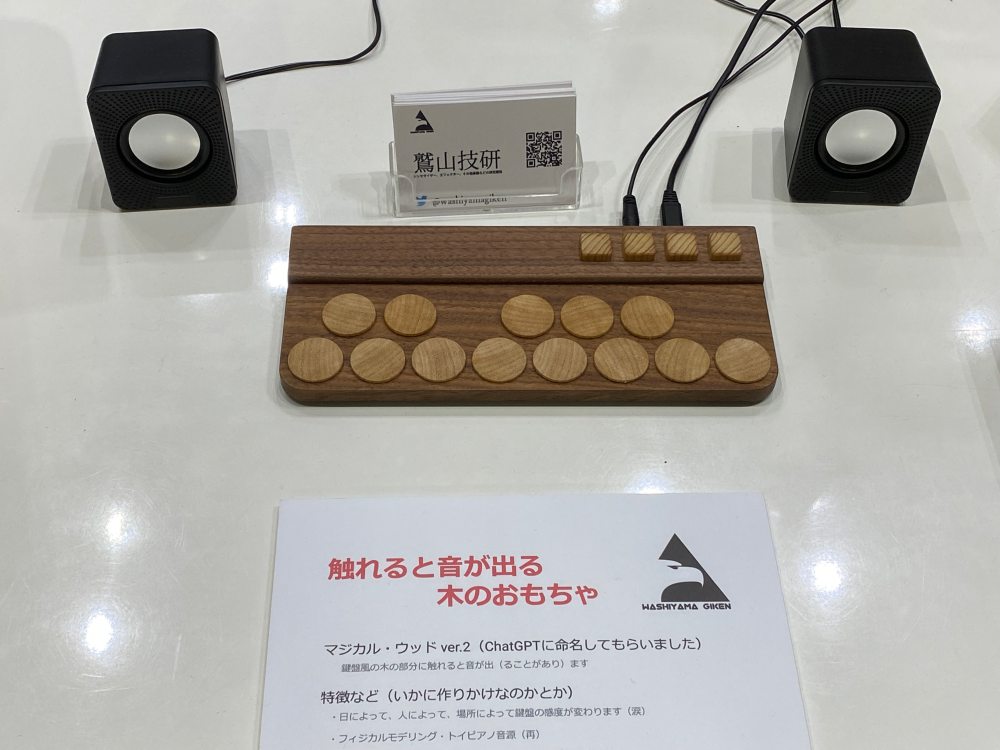
本日初めて行ってきました。オレイリージャパンの主催でスポンサーも多数、出展は個人レベルから趣味のグループ、大学が主体でメーカーは少ない印象です。
そのうちのいくつかの作品から、全部の写真は多すぎなのでおいおい整理、
1 静電容量方式でキータッチすると音階を指定できるキーボード。
2 自作のMRI、液体窒素冷却とかしなくとも解像度が低くなるけれども核磁気共鳴はセンスできるそうです。画像に落とし込むソフトも全部自作だそうです。おそらく標準のライブラリはあるでしょうが。

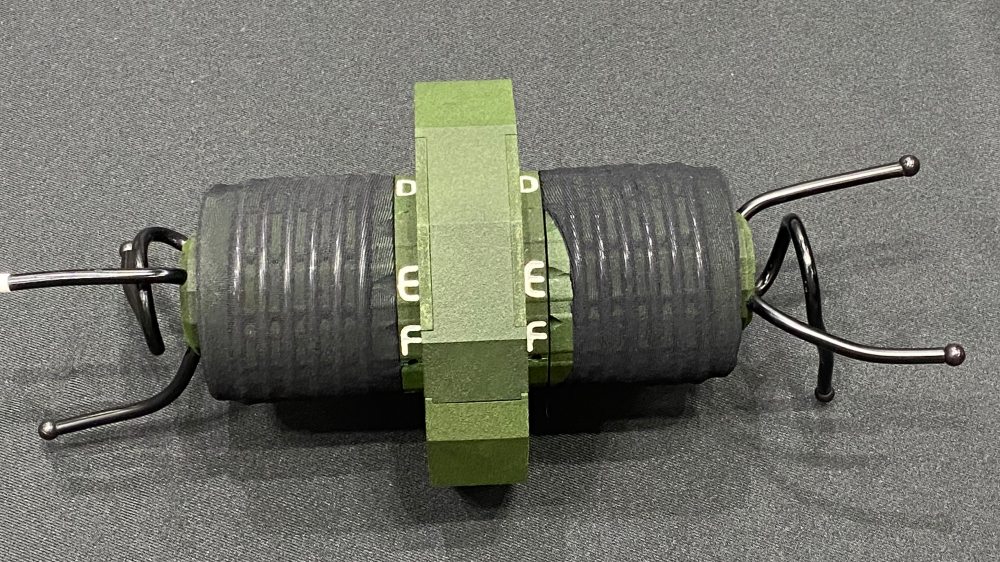
3 両手で持って、リングのように見えるのが弦相当で演奏できる電子楽器。
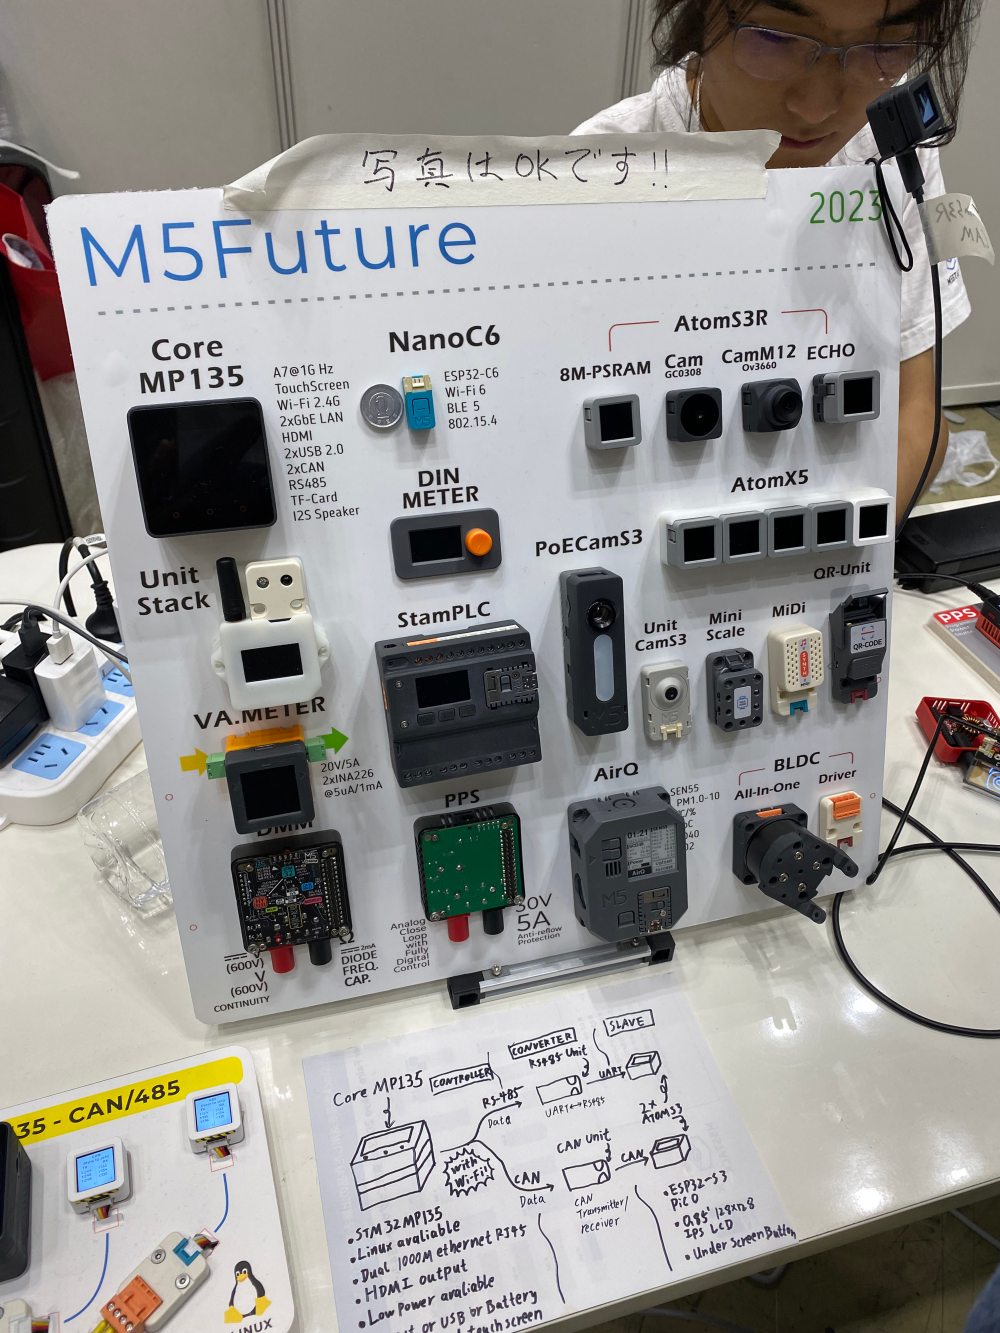
会場の作品を見ると、多くはラズパイ、M5Stackを使っています。これはM5Stackのブース。
全部を細かく見だすと、到底一日ではカバーできそうもないので最後は結構駆け足になってしまいました。
個人的に会場の作品制作などを見て、あれば良さそう(欲しい)と思ったのは、レーザーカッターと多軸関節ロボットアーム。どちらも10万円以下で個人でなら使えそうなものが手にはいる。
admin
println!とかvec!はRustにおける頻繁に使われるマクロですが、マクロは多くの言語が持つ機能でそれはコンパイル時には展開されます。じゃRustのマクロがどのように展開されるか?を見るためのツールにcargo expandがあります。
https://crates.io/crates/cargo-expand
cargo initで作成されるmain.rsで見てみます。
<ソース>
fn main() {
    println!("Hello, world!");
}
マクロを含んだソースコードを対象にするならば、*.rsファイルの存在するディレクトリでcargo expandを実行します。
<展開後>
#![feature(prelude_import)]
#[prelude_import]
use std::prelude::rust_2021::*;
#[macro_use]
extern crate std;
fn main() {
    {
        ::std::io::_print(format_args!("Hello, world!\n"));
    };
}
展開されたコード中には、さらにformat_args!というマクロが見えています、まあマクロからマクロは呼び出しできるから。
format_argsマクロを検索すると、以下のように記述されています。
https://doc.rust-lang.org/std/macro.format_args.html
macro_rules! format_args {
    ($fmt:expr) => { ... };
    ($fmt:expr, $($args:tt)*) => { ... };
}
という事で、引数がいくつかある場合にそれを展開してprint形式を作り出すマクロです。
実はcargo expandはパラメタ指定でソースコードではなくてバイナリからもマクロが展開されたソースコードの出力ができます。ソースコードからexpandしたものと全く同じに見えますが。
#![feature(prelude_import)]
#[prelude_import]
use std::prelude::rust_2021::*;
#[macro_use]
extern crate std;
fn main() {
    {
        ::std::io::_print(format_args!("Hello, world!\n"));
    };
}
使い道はカスタムに作られたマクロのソースコード確認用になるでしょうか。
admin
メモリ管理を厳密に実行できるRustではスレッド間通信にmutexを使うのも現実的のように思います。おそらくchannelよりは軽量だろうと想像されるから。
https://doc.rust-jp.rs/book-ja/ch16-03-shared-state.html
を参考にchannel版からmutex版に書き換えてみます。
https://isehara-3lv.sakura.ne.jp/blog/2023/10/10/スレッド間通信でchannelを使うrust/
肝は追加されたクレートのMutexとArcになるでしょう。Rcはスレッドセーフではないので多少処理は遅くなるけれどもArcが用意されているようです。
以下のコードではchannel版をコメントアウトしてmutexに置き換えています。
use std::sync::{Mutex, Arc};
use std::thread;
use std::time::Duration;
//use std::sync::mpsc;

fn main() {
    //let (tx, rx) = mpsc::channel();
    let count = Arc::new(Mutex::new(0));
    let mut handles = Vec::new();

    for i in 0..3 {
        //let thread_tx = tx.clone();
        let count = Arc::clone(&count);
        let handle = thread::spawn(move || {
            for j in 1..10 {
                println!("hi number {} {} from the spawned thread!", i, j);
                thread::sleep(Duration::from_millis(1));
            }
            //thread_tx.send(i).unwrap();
            let mut num = count.lock().unwrap();
            *num += 1;
        });
        handles.push(handle);
    }

    for i in 1..5 {
        println!("hi number {} from the main thread!", i);
        thread::sleep(Duration::from_millis(1));
    }

    for handle in handles {
        handle.join().unwrap();
    }

    //drop(tx);       // without drop(), this program doesn't terminate, wait for tx forever
/*
    for received in rx {
        println!("Got from the threads : {}", received);
    }
*/
    println!("Result: {}", *count.lock().unwrap());

}
mutexで定義した変数の型は整数型ではない(VScode上では:Arc<Mutex[i32; 1]>>と表示されている)ので、unwrap()してやらないといけないのはRust特有ですが、Rustのスレッド間通信(共有)でmutexも選択肢に入りそうです。
admin
Rustの場合にはchannelを使わなくても、メモリ管理がきちんとされているのでmutexでも良さそうなのですが、channelの方が使うのは簡単だと思う。ほぼGolangと同等の機能ですが、rx/txを同時に定義するのは異なります。Golangは -> もしくは <- でインアウトを切り替えるし、channelのサイズも指定しますが、RustではFIFOのように動作します。
以下のコードは、
https://isehara-3lv.sakura.ne.jp/blog/2023/10/06/並行処理rust/
にスレッド起動後にスレッドの番号をchannelに送るようにしたもの。一点注意すべきはtxはmainスレッド中で生成されているので、for received in rx処理はdrop(tx)しないと無限待ちになること。もしクロージャー中ならば、そのライフが終わった時点でdrop()されますが。
use std::thread;
use std::time::Duration;
use std::sync::mpsc;

fn main() {
    let (tx, rx) = mpsc::channel();
    let mut handles = Vec::new();
    for i in 0..3 {
        let thread_tx = tx.clone();
        let handle = thread::spawn(move || {
            for j in 1..10 {
                println!("hi number {} {} from the spawned thread!", i, j);
                thread::sleep(Duration::from_millis(1));
            }
            thread_tx.send(i).unwrap();
        });
        handles.push(handle);
    }

    for i in 1..5 {
        println!("hi number {} from the main thread!", i);
        thread::sleep(Duration::from_millis(1));
    }

    for handle in handles {
        handle.join().unwrap();
    }

    drop(tx);       // without drop(), this program doesn't terminate, wait for tx forever

    for received in rx {
        println!("Got from the threads : {}", received);
    }

}
出力の最後部分だけ、
~~~~~~
hi number 0 9 from the spawned thread!
hi number 2 9 from the spawned thread!
Got from the threads : 0
Got from the threads : 1
Got from the threads : 2
P.S. 同じスレッド間での通信になっていたので修正(2023/10/11)
送信エンドポイントはclone()しないとコンパイルが通りません(moveしたものをdrop()はできないから)。clone()して複数の送信エンドポイントから送信でもrxに集約されるようです。
admin
nasへのバックアップが完了していない事がM1 macbookで数日継続、毎週一回リブートしてますがsonomaへのアップデート後に起きているようなので再度リブートで『遅延』は発生していない模様です。
ちなみにintel MacBookは毎朝リブートしているせいか、このような現象は出ていない。
まあ、ありがちな事象ではあります。
admin
Rustももちろん並行処理ができて、そのロジックは他の言語と類似ですが、簡単なコードで確認。Rustのドキュメンtの並行処理を多少改変しています。
どこが改変かというと、スレッドを複数spawnした時の終了待ちをhandleを配列(handles)に入れて、配列からhandleを取り出して全ての終了を待つようにしています。GolangのWaitGroupに相当する機能はなさそうなので、
use std::thread;
use std::time::Duration;

fn main() {
    let mut handles = Vec::new();
    for i in 0..3 {
        let handle = thread::spawn(move || {
            for j in 1..10 {
                println!("hi number {} {} from the spawned thread!", i, j);
                thread::sleep(Duration::from_millis(1));
            }
        });
        handles.push(handle);
    }

    for i in 1..5 {
        println!("hi number {} from the main thread!", i);
        thread::sleep(Duration::from_millis(1));
    }

    for handle in handles {
        handle.join().unwrap();
    }
}
<実行結果>
hi number 1 1 from the spawned thread!
hi number 2 1 from the spawned thread!
hi number 1 from the main thread!
hi number 0 1 from the spawned thread!
hi number 1 2 from the spawned thread!
hi number 2 2 from the spawned thread!
hi number 2 from the main thread!
hi number 0 2 from the spawned thread!
hi number 1 3 from the spawned thread!
hi number 2 3 from the spawned thread!
hi number 0 3 from the spawned thread!
hi number 3 from the main thread!
hi number 1 4 from the spawned thread!
hi number 2 4 from the spawned thread!
hi number 0 4 from the spawned thread!
hi number 4 from the main thread!
hi number 1 5 from the spawned thread!
hi number 2 5 from the spawned thread!
hi number 0 5 from the spawned thread!
hi number 1 6 from the spawned thread!
hi number 0 6 from the spawned thread!
hi number 2 6 from the spawned thread!
hi number 0 7 from the spawned thread!
hi number 1 7 from the spawned thread!
hi number 2 7 from the spawned thread!
hi number 0 8 from the spawned thread!
hi number 1 8 from the spawned thread!
hi number 2 8 from the spawned thread!
hi number 0 9 from the spawned thread!
hi number 1 9 from the spawned thread!
hi number 2 9 from the spawned thread!
二重ループ処理の複数(三個)のスレッドが動作しています。もちろんスレッドの実行順序は指定できません。
admin
DIで依存関係のあるファイルを定義すると、その依存関係を解決したコードを生成するツールです。これだけでは訳がわからなので以下から実例を。
https://www.asobou.co.jp/blog/web/google-wire
はwireのtutorialをベースに記述しています、https://github.com/google/wire
まず何はともあれwireをインストールします、実はwireはコマンド実行で依存関係を記述したコードを作成します。
% go install github.com/google/wire/cmd/wire@latest
インストールするとパスが通っていれば、% wireで実行できるようになります。
//+build wireinject

package main

import "github.com/google/wire"

func InitializeEvent() Event {
    wire.Build(NewEvent, NewGreeter, NewMessage)
    return Event{}
}
ここで、NewEvent, NewGreeter, NewMessageが依存関係のある構造体の名前になります。wire.Bildの引数にこれらの構造体の情報を与えると、依存関係を調べて、依存関係を解消するコードを% wire で生成します。(以下)
// Code generated by Wire. DO NOT EDIT.

//go:generate go run github.com/google/wire/cmd/wire
//go:build !wireinject
// +build !wireinject

package main

// Injectors from wire.go:

func InitializeEvent() Event {
	message := NewMessage()
	greeter := NewGreeter(message)
	event := NewEvent(greeter)
	return event
}
実は生成されたコードは、元の依存関係を記述しているコード(コメント部分)と同じで、Intialize Eventで呼び出しているだけになります。
func main() {
    e := InitializeEvent()

    e.Start()
}

/*
func main() {
    message := NewMessage()
    greeter := NewGreeter(message)
    event := NewEvent(greeter)

    event.Start()
}
*/
実行するには、
% go buildで実行ファイルを作成すれば、作成されたコードをリンクした実行ファイルが作成されるの、そのまま実行可能です。
このtutorialでは単純なケースなので、それほどメリットは感じられませんが依存関係が複雑になればwireを使うメリットがあるように思います。
admin
現代の言語で多くは関数を第一級オブジェクトとして扱えます、第一級オブジェクトとは言語の持つ基本的な操作を制限なしに実行できることというのがWikipediaでの解説(以下引用)
“第一級オブジェクト(ファーストクラスオブジェクト、first-class object)は、あるプログラミング言語において、たとえば生成、代入、演算、(引数・戻り値としての)受け渡しといったその言語における基本的な操作を制限なしに使用できる対象のことである。”
で、第一級オブジェクトとして関数が扱えれば、それは第一級関数となります。より具体的には以下の使用例を。以下やってることは冗長なだけですが、関数を変数に代入できることは『その言語における基本的な操作を制限なしに使用できる』の一つに該当します。
実際にやっていることは関数の型とポインタを渡しているだけだろうと思いますが。
package main

import (
	"fmt"
	"math"
)

type calif interface{
	calc(i float64) float64
}

type calst struct{
	c calif
}

func (c calst)calc(i float64) float64 {
	return math.Sqrt(i)
}

func main() {
	ci := calst{}
	cal := ci.calc(1)
	ary := []float64{25, 36, 100, 121, 144}
	for _, ft := range ary {
		cal = ci.calc(ft) // set func(calc) to variable(cal)
		fmt.Println(cal)
	}
}
現代の多くの言語では、関数は第一級オブジェクトですが、Rustではそうなっていないようです。意図した理由はあるはずですが、
https://zenn.dev/hinastory/articles/7857427ea390c5
admin
contextは英語の意味は『文脈』ですが、プログラミングにおいては言語に関わらず使われる用語なので、おそらく他に適切な用語はなさそう。
その意味するところはAPI境界を超えて、スレッド間でも共有可能なオブジェクトを提供するといったところかと思います。contextはあたかも一つのスレッドのような動作をするように思います。
contextが一番使われるシーンはJavaでもありますがHttpRequestのようなネットワーク処理でタイムアウトやキャンセルが発生するようなケースに相性が良いから。
以下はcontextでcancel()処理とtimeout()処理、それに何らかの値(key/value pair)を設定してみたもの。
package main

import(
	"context"
	"fmt"
	"time"
)

func main() {
	ctx0 := context.Background()		// to initialize the context

	ctx1, cancel1 := context.WithCancel(ctx0)	// to generate cancel function "cancel1"

	ctx3 := context.WithValue(ctx1, "key1", 99)

	go func(ctx1 context.Context) {
		select {
		case <-ctx1.Done():
			fmt.Println("th1 was canceled")
		}
	}(ctx1)

	ctx2, _ := context.WithTimeout(ctx0, 2*time.Second)	// to set the context to timeout mode

	go func(ctx2 context.Context) {
		select {
		case <-ctx2.Done():
			fmt.Println("th2 was timeouted", "key value : ", ctx3.Value("key1"))
		}
	}(ctx2)

	cancel1()

	time.Sleep(3*time.Second)
}
最後の3秒待ちは値が2秒だとfunc(ctx2)処理が完了する前にプログラムが終了するのでこの値以上が必要です。
channelを使ってclose()処理をしても同じように処理はできますが、
https://zenn.dev/hsaki/books/golang-context/viewer/done
じゃなぜcontextを使うかというと、channelはgoroutine限定ですがcontextは汎用的に使えるからと言うことになるでしょう。
admin