VScodeのCode Runnerの設定

C++のVScode環境でほぼハマるのが、コンパイラーのバージョン互換問題。ほぼ3年毎にメジャーチェンジがあるので、新しい機能はデフォルトのままでは動かない。

具体的にはラムダ式がデフォルト設定ではダメでした。error以外にもwarningがそれ以前には出ていましたが、とりあえず前には進めるから放置してました。

を参照して、① コンソール入力可能にするのはメニューから設定して、② コンパイラーバージョン設定はcode-runnerのsettings.jsonファイル中の最後部分、”code-runner.runInTerminal”: true以下に点線で挟まれた部分を追加。ただし、以下の太字($fileName)のところは参照内容から変更してます。

———————————————————–
,
“code-runner.executorMap”: {
“cpp”: “cd $dir && runFiles=`ls *.cpp` && g++ -std=c++17 $fileName -o $fileNameWithoutExt && $dir$fileNameWithoutExt”,
},
“clang.cxxflags”: [
“-std=c++20”
]
———————————————————–
これで新しい機能もコンパイルできるようになりました。
admin

M5Stack UnitV2 AI カメラ(SSD202D)

M5stackにつながるカメラにそれほどの選択肢はありませんが、これは面白そうです。A.I機能がビルトインされてて購入時点で使えるとのことなので、画像認識系のアプリを簡単に作成するには便利そうです。

https://www.switch-science.com/catalog/7160/

Linux系らしいので、多少モディファイするのも難易度は高くはなさそうです。

(画像はスイッチサイエンスのwebから)


admin

M5stack grayでBLEを使う

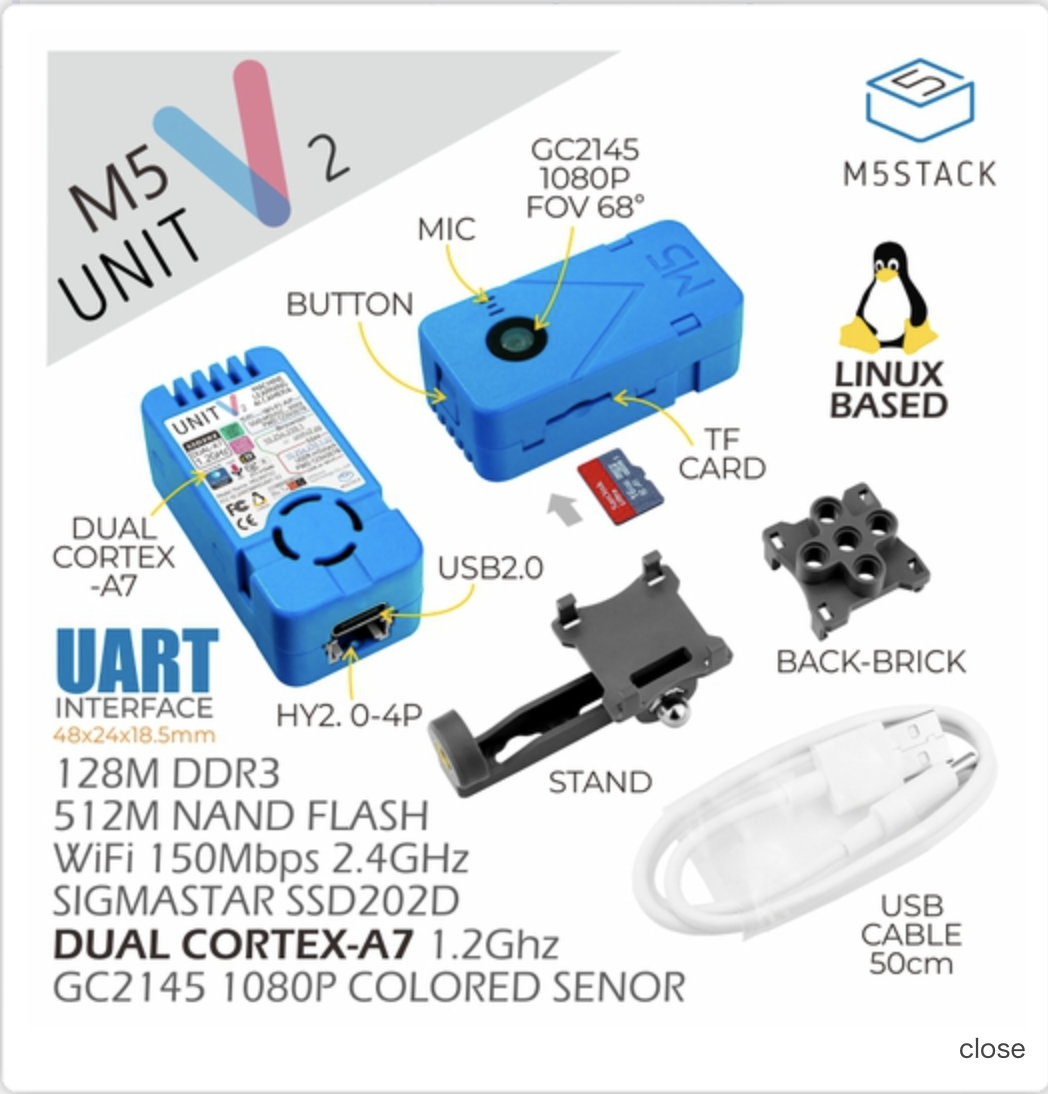
M5stackには色々な機能が含まれているので、順次の機能確認でまずはBLE機能を使ってみます。

ソースはPlatformIOのライブラリでBuil-in中のESP32 BLE ArduinoのRevealから見えるBLE_scanから持ってきています。ライブラリーにM5stack追加とソースに

#include <m5stack.h> はM5stack使う時には必ず追加必要です。

#include <m5stack.h>    // this is needed to the original source code.

/*
   Based on Neil Kolban example for IDF: https://github.com/nkolban/esp32-snippets/blob/master/cpp_utils/tests/BLE%20Tests/SampleScan.cpp
   Ported to Arduino ESP32 by Evandro Copercini
*/

#include <bledevice.h>
#include <bleutils.h>
#include <blescan.h>
#include <bleadvertiseddevice.h>

int scanTime = 5; //In seconds
BLEScan* pBLEScan;

class MyAdvertisedDeviceCallbacks: public BLEAdvertisedDeviceCallbacks {
    void onResult(BLEAdvertisedDevice advertisedDevice) {
      Serial.printf("Advertised Device: %s \n", advertisedDevice.toString().c_str());
    }
};

void setup() {
  Serial.begin(115200);
  Serial.println("Scanning...");

  BLEDevice::init("");
  pBLEScan = BLEDevice::getScan(); //create new scan
  pBLEScan->setAdvertisedDeviceCallbacks(new MyAdvertisedDeviceCallbacks());
  pBLEScan->setActiveScan(true); //active scan uses more power, but get results faster
  pBLEScan->setInterval(100);
  pBLEScan->setWindow(99);  // less or equal setInterval value
  M5.begin();       //Init M5Core.  
  M5.Power.begin(); //Init Power module.  
  M5.Lcd.fillScreen(BLACK); //Set the screen background color to black. 
  M5.Lcd.setTextColor(GREEN , BLACK); //Sets the foreground color and background color of the displayed text.  
  M5.Lcd.setTextSize(2);    //Set the font size.  
  M5.Lcd.setCursor(0, 70);
  M5.Lcd.printf("pow on");
}

void loop() {
  // put your main code here, to run repeatedly:
  BLEScanResults foundDevices = pBLEScan->start(scanTime, false);
  Serial.print("Devices found: ");
  Serial.println(foundDevices.getCount());
  Serial.println("Scan done!");
  pBLEScan->clearResults();   // delete results fromBLEScan buffer to release memory
  delay(2000);
}
このソースは関数をポインタにして、onResult()はイベント待ちだろうからコールバック関数使ってます。コールバック関数使うために関数をポインタ化するんでしょうが。
シリアル出力を使っているので、platformio.iniで速度指定をしないと文字化けします。

monitor_speed = 115200

を追加して実行させると、メッセージを吐き出しますが以下はその一部です。

Devices foundが0というのは不思議ですが。


admin

プロボノ

何の略語か気にしたことはなかったけれども、ラテン語の“pro bono publico”(公共善のために)ということなのだ。

bonoはbonum(中性名詞)のablative(日本語だと奪格)、同じくpublicoはpublicus(形容詞)のablativeで、前置詞pro(この場合はforが適切か)は後にくる名詞はablativeであることが前提だからそのように格変化。ラテン語が英語化しているものは多いけれどもその中のひとつ。

admin

M5stack IMUとサーボモーターの連動(二軸)ーーその2

二つ前の記事でIMUとサーボモーターを連動させたので、構造部分を作成してM5stackの直立状態を保持できるような姿勢制御を作ってみました。

M5stack IMUとサーボモーターの連動(二軸)

前回からの変更点はサーボ制御部分のみです。


#include <imu.h>

int servopinx=2;    // dio port definition for X axis
int servopiny=5;    // dio port definition for Y axis
int pulsewidth;     // pwm on time
int repeat=1;       // number of pwm write cycle repetition
int ax;             // angle for servo motors
int ay;
int az;
float p_accX;       // to hold IMU read data
float p_accZ;
int p_angX;         // to hold servo motor angles
int p_angZ;
boolean first = true;   // check if it is first cycle or not.
//
void servo(int myangle, int motor)      // servo motor pwm contorol. motor 0 : servoponx , motor 1 : servopiny
{
 for (int i = 0; i < repeat; i ++)      // i is used to keep a moving time, since this source does not use the library.
 {
    int port;
    if (motor == 0){
        port = servopinx;
         }
        else{
        port = servopiny;
    }
    pulsewidth=map(myangle,0,180,500,2500);
    digitalWrite(port,HIGH);
    delayMicroseconds(pulsewidth);
    digitalWrite(port,LOW);
    delay(20-pulsewidth/1000);
 }
}
void init_sm()
{
    servo(90, 0);
    servo(90, 1);
    p_angX = 90;
    p_angZ = 90;
    delay(600);
}
void setup()
{
 setup_imu();
 pinMode(servopinx,OUTPUT);
 pinMode(servopiny,OUTPUT);
}
void loop()
{
 loop_imu();
 if (first == true){
    init_sm();                  // initialize to 90 degree
    first = false;
    }
// the angle change is needed? & the change is reflected? & check the angle limit
 if (accX < -0.05 && abs(p_accX - accX) > 0.02 && p_angX < 180){ p_angX ++; } else{ if (accX > 0.05 && abs(p_accX - accX) > 0.02 && p_angX > 0){
             p_angX --;
         }
     }
 if (accZ < -0.05 && abs(p_accZ - accZ) > 0.02 && p_angZ < 180){ p_angZ ++; } else{ if (accZ > 0.05 && abs(p_accZ - accZ) > 0.02 && p_angZ > 0){
             p_angZ --;
         }
     }
 p_accX = accX;                 // set to the previous values
 p_accZ = accZ;
 servo(p_angZ , 0);             // drive the servo motor
 servo(p_angX , 1);
 delay(1);
 M5.Lcd.setCursor(0, 114);
 M5.Lcd.printf("%3d  %3d ", p_angX, p_angZ);
}


imu.hには変更ありません。

今回はM5stackを垂直で使うので、二次元を水平に保つのはX軸とZ軸になるので、IMUからの読み出しデータはそれらを使います。

M5stackが移動するときには重力加速度以外の加速度も加算されますが、このアプリではそれを勘案する必要はないでしょう。多少動きがオーバーシュートするのはそのせいかもしれませんが。

写真は以下の通り。

サーボーモーターの電源入れない状態でM5stackを動かしているので、画面のアングル表示は変な値になっています。初期値がどうであっても、最後は収束しますが。

コードと3dプリンタ用のstlファイルは、

https://github.com/chateight/servo_

に置いてあります。M5stack追従のロジックは改善の余地があるように思います。

M5stack本体との接続は、DIO2,5とGNDの三本だけ。


admin

macOS Monterey 12.2 updateで、

先週末にアップデートしましたが、以下が挙動不審。

① 毎日早朝のリフレッシュブートが実行されない

② timemachineの定時バックアップが実行されない

スケジューラーはTimeMachineEditor使ってます。


アップデートしてないAirはちゃんと動いているようだから、おそらくOSアップデートでの問題だろうと思う。まあ過去の経験からそのうち修正されるでしょう。


admin