自走車にライントレース機能を付加する(センサー編)

ライントレースはロボット構成の基本要素なので、一度はやってみます。

一年半前に作った自走車(超音波センサーで障害物回避)にライントレース機能を付加するのが便利そうなのでそれでやります。

センサーは、

https://resources.kitronik.co.uk/pdf/56111-kitronik-move-line-following-board-datasheet.pdf

ですが、フォトダイオードと光センサートランジスターを組み合わせた出来合いのモジュールを使います。電源電圧3V時に黒で3V、白で0Vが出力されます。

取り付け位置は中央ネジで3Dプリンタで造形したアタッチメント経由で取り付けの予定。

ラインマットとセンサーの距離が重要だろうから、事前にM5Stack使って距離を決めてやります。

<黒>

<白>


もちろん白黒で理想的に0Vや3Vにはならないから、ダイナミックレンジが取れそうなところで距離を設定します。どちらにしても近すぎても(シートに接触するぐらいに知るとかえってダイナミックレンジは悪化)遠すぎても(もちろん反射光を拾うのが動作原理なので論外)いけません。

で、概ね5mmあたりが適切のようです。

P.S. 2023/5/11

ArduinoのADCで読み込むと黒と白の値が反転してます。なぜだろう?


admin

Arduino carに圧電スピーカーを追加したけど、

立ち上げで初期化完了時にサウンド、バックするときにも違うサウンドを出す、としたいけど、初期化完了時はともかく、バックする時にサウンド出すと、なぜか前進切り替わり時にDCモーターの左側が動いたり動かなかったり(大半は動かない)。なんで圧電スピーカーならすDIO(pin14)とそれ以外のDIOが干渉するか分かりませんが、どうもタスクコントロールに問題があるんだろうからFreeRTOSに理解が浅いだけだろうと思う。

スピーカーはArduinoやDCモーター駆動基板を覆うような形で作ってみた。造形時間3時間ぐらいで、天井に圧電スピーカーをマウントできるようにしています。Arduinoとの接続はハンダ付だと分解が大変そうなので、ピンをArduinoのコネクタに差し込むようにして対応。


P.S.

タスクにしないで、直接関数呼び出しても同じ現象が起こるから、RTOS問題では無さそう。tone()関数はCPUのタイマー使っているから、実はそれがRTOSと競合しているとかあるのかな?

DIOを14から16に変えても状況に変化無し。

ということでback_sound()ではtone()関数使わないで、”ド4(およそ262Hz)”の音をおよそ0.3秒間出すようにしてみたらDCモーターがマトモに動くようです。

setup()からはtone()を呼び出してもこれは問題ないからそのまま使います。ArduinoライブラリにはFreeRTOS、つまりマルチタスク環境では上手く動作しない関数(thread safeでは無い関数)があるのかもしれません。

int pinNo = 16;
void buzzer_setup() {
  tone( pinNo, 98, 200 );   // Gの音を発信
  delay( 220 );
  tone( pinNo, 110, 200 );  // Aの音を発信
  delay( 220 );
  tone( pinNo, 123, 200 );  // Bの音を発信
  delay( 220 );
  tone( pinNo, 130, 200 );  // Cの音を発信
  delay( 1000 );
}

void back_sound() {
  //tone( pinNo, 98, 100 );  // Gの音を発信
  //delay( 150 );
  //tone( pinNo, 98, 100 );  // Gの音を発信
  //delay( 150 );

  for(uint16_t count=0; count<78; count++){
    digitalWrite(pinNo, HIGH);
    delayMicroseconds(1908);
    digitalWrite(pinNo, LOW);
    delayMicroseconds(1909);
  }
}

現状のソースコードやstlファイルのリンクはこちら。

https://github.com/chateight/arduino/tree/master/smart_car_RTOS


admin

Arduino carをAPモードで使えるようにした

Wi-Fi環境がない場所でも使えるようにするには、よくあるようにAPモードにするしかないですが、

https://www.arduino.cc/en/Guide/MKRWiFi1010/web-server-ap-mode

のコードを流用して、wi-fiモードからAPモードに変更しました。デフォルトのAPモードのIPアドレスは192.168.4.1になります。

wi-fi通信も一つのタスクで、タスクモジュールを入れ替えしただけなので、全体のロジックには変更ありません。

#include <WiFiNINA.h>

char ssid_ap[] = "a_car_ap";        // your network SSID (name)
char pass_ap[] = "coderdojo";    // your network password (use for WPA, or use as key for WEP)
//int keyIndex = 0;                // your network key Index number (needed only for WEP)

int led =  LED_BUILTIN;
int status = WL_IDLE_STATUS;
WiFiServer server(80);

void printWiFiStatus() {
  // print the SSID of the network you're attached to:
  Serial.print("SSID: ");
  Serial.println(WiFi.SSID());

  // print your WiFi shield's IP address:
  IPAddress ip = WiFi.localIP();
  Serial.print("IP Address: ");
  Serial.println(ip);

  // print where to go in a browser:
  Serial.print("To see this page in action, open a browser to http://");
  Serial.println(ip);

}

//
void init_wifi_ap() {
  //Initialize serial and wait for port to open:
  Serial.begin(9600);
  //while (!Serial) {
    ; // wait for serial port to connect. Needed for native USB port only
  //}

  Serial.println("Access Point Web Server");

  pinMode(led, OUTPUT);      // set the LED pin mode

  // check for the WiFi module:
  if (WiFi.status() == WL_NO_MODULE) {
    Serial.println("Communication with WiFi module failed!");
    // don't continue
    while (true);
  }

  String fv = WiFi.firmwareVersion();
  if (fv < WIFI_FIRMWARE_LATEST_VERSION) {
    Serial.println("Please upgrade the firmware");
  }

  // print the network name (SSID);
  Serial.print("Creating access point named: ");
  Serial.println(ssid_ap);

  // Create open network. Change this line if you want to create an WEP network:
  status = WiFi.beginAP(ssid_ap, pass_ap);
  if (status != WL_AP_LISTENING) {
    Serial.println("Creating access point failed");
    // don't continue
    while (true);
  }

  // wait 10 seconds for connection:
  delay(10000);

  // start the web server on port 80
  server.begin();

  // you're connected now, so print out the status
  printWiFiStatus();
}

//
int web_server_ap() {
  // compare the previous status to the current status
  if(status != WiFi.status()) {
    // it has changed update the variable
    status = WiFi.status();

    if(status == WL_AP_CONNECTED) {
      // a device has connected to the AP
      Serial.println("Device connected to AP");
    } else {
      // a device has disconnected from the AP, and we are back in listening mode
      Serial.println("Device disconnected from AP");
    }
  }

  WiFiClient client = server.available();   // listen for incoming clients

  int g=9;                                  // run or halt return

  if (client) {                             // if you get a client,
    Serial.println("new client");           // print a message out the serial port
    String currentLine = "";                // make a String to hold incoming data from the client
    while (client.connected()) {            // loop while the client's connected
      if (client.available()) {             // if there's bytes to read from the client,
        char c = client.read();             // read a byte, then
        Serial.write(c);                    // print it out the serial monitor
        if (c == '\n') {                    // if the byte is a newline character

          // if the current line is blank, you got two newline characters in a row.
          // that's the end of the client HTTP request, so send a response:
          if (currentLine.length() == 0) {
            // HTTP headers always start with a response code (e.g. HTTP/1.1 200 OK)
            // and a content-type so the client knows what's coming, then a blank line:
            client.println("HTTP/1.1 200 OK");
            client.println("Content-type:text/html");
            client.println();

            // the content of the HTTP response follows the header:
            client.print("Click here turn the car on
");
            client.print("Click here turn the car off
");

            // The HTTP response ends with another blank line:
            client.println();
            // break out of the while loop:
            break;
          }
          else {      // if you got a newline, then clear currentLine:
            currentLine = "";
          }
        }
        else if (c != '\r') {    // if you got anything else but a carriage return character,
          currentLine += c;      // add it to the end of the currentLine
        }

        // Check to see if the client request was "GET /H" or "GET /L":
        if (currentLine.endsWith("GET /H")) {
          g = 1;
          //digitalWrite(led, HIGH);               // GET /H turns the LED on
        }
        if (currentLine.endsWith("GET /L")) {
          g = 0;
          //digitalWrite(led, LOW);                // GET /L turns the LED off
        }
      }
    }
    // close the connection:
    client.stop();
    Serial.println("client disconnected");
  }
  return g;
}

全体のソースコードは、

https://github.com/chateight/arduino

にあります。

既存のwi-fiモードもそのままコードを残していますが、グローバル変数が重複するので、wifi_server.inoは二行(line 30, 31)をコメントアウトしないといけません。

似たような機能を記述するときには、名前空間あるいはクラスを使って分離した方が良いでしょう。

P.S. USBでパソコンに接続されていないときに、シリアルのオープン待ちが終了しない(つまり単独では動かない)のでコメントアウト。


admin


M5stackをVS codeで使う(1)

Arduino IDEはコンパイル遅いし、使い慣れたVS codeの方が良さそうに見えるので、VS codeで環境構築。コアとなる拡張機能はPlatformIOになります。

参考サイトは以下の通り、

https://haratta-tech-lab.com/m5stack-intro-arduino-vscode/#toc12

https://fabcross.jp/category/make/sorem5/20210112_cat_robot.html

ライブラリは画像中のワークスペースではなく、PlatformIO管理下に配置されるようです。この例ではM5Stack.hとSimpleBeep.hを組み込んでいますが、必要になればPlatformIOのライブラリ管理で必要なライブラリを追加すれば良さそうです。実はライブラリ管理は少々複雑のようですが、まずは必要なら都度追加で問題はないでしょう。

コンパイル速度はArduino IDEよりも明かに高速化しているように思う。


admin


Visual Studio CodeでArduino環境

たまたまVSCode開いたら、Arduino拡張機能をおすすめされている。

調べてみると、MicroSoftのプラグインは実は裏ではArduino IDEをそのまま使っているらしいけど、Arduino IDEよりもVS Codeの方がエディタとしても使いやすいと思うから移行かな。


admin

Arduino MKR WiFi 1010のVin電圧の規格

以下のリンクの公式ドキュメントによると5.5V、しかしどこかには6V以上という記載もあったので、バッテリー充電制御のICの規格を当たってみる。

https://docs.arduino.cc/static/fc77c3c3c77d69764ba7773df64c99db/ABX00023-datasheet.pdf

使用しているのはBQ24195Lなので仕様を見てみると、

https://www.tij.co.jp/product/jp/BQ24195L

最大定格で17Vだから10V以下なら余裕ということになる。NiHの5直だと初期は7Vぐらいになるから確認のために。


admin

Arduino MKR WiFi 1010のWi-Fiファームウェアアップデート

サンプルプログラムの版数チェックで版数上げろと言われるのでアップデート。

処理プログラム自身をArduinoに書き込んで実行します。

手順は以下に記載ありますが、

https://support.arduino.cc/hc/en-us/articles/360013896579-Check-and-update-the-firmware-for-WiFiNINA-and-WiFi101

要はArduinoメニューから、

WiFiNINA Firmware Updaterを選択して、

Updaterの指示に従えばうまくいきました。


admin

FreeRTOSのタスク遷移とタスク間通信

FreeRTOSでタスクのコントロールとタスク間通信ができれば、当面のやりたい事はできるようになります。
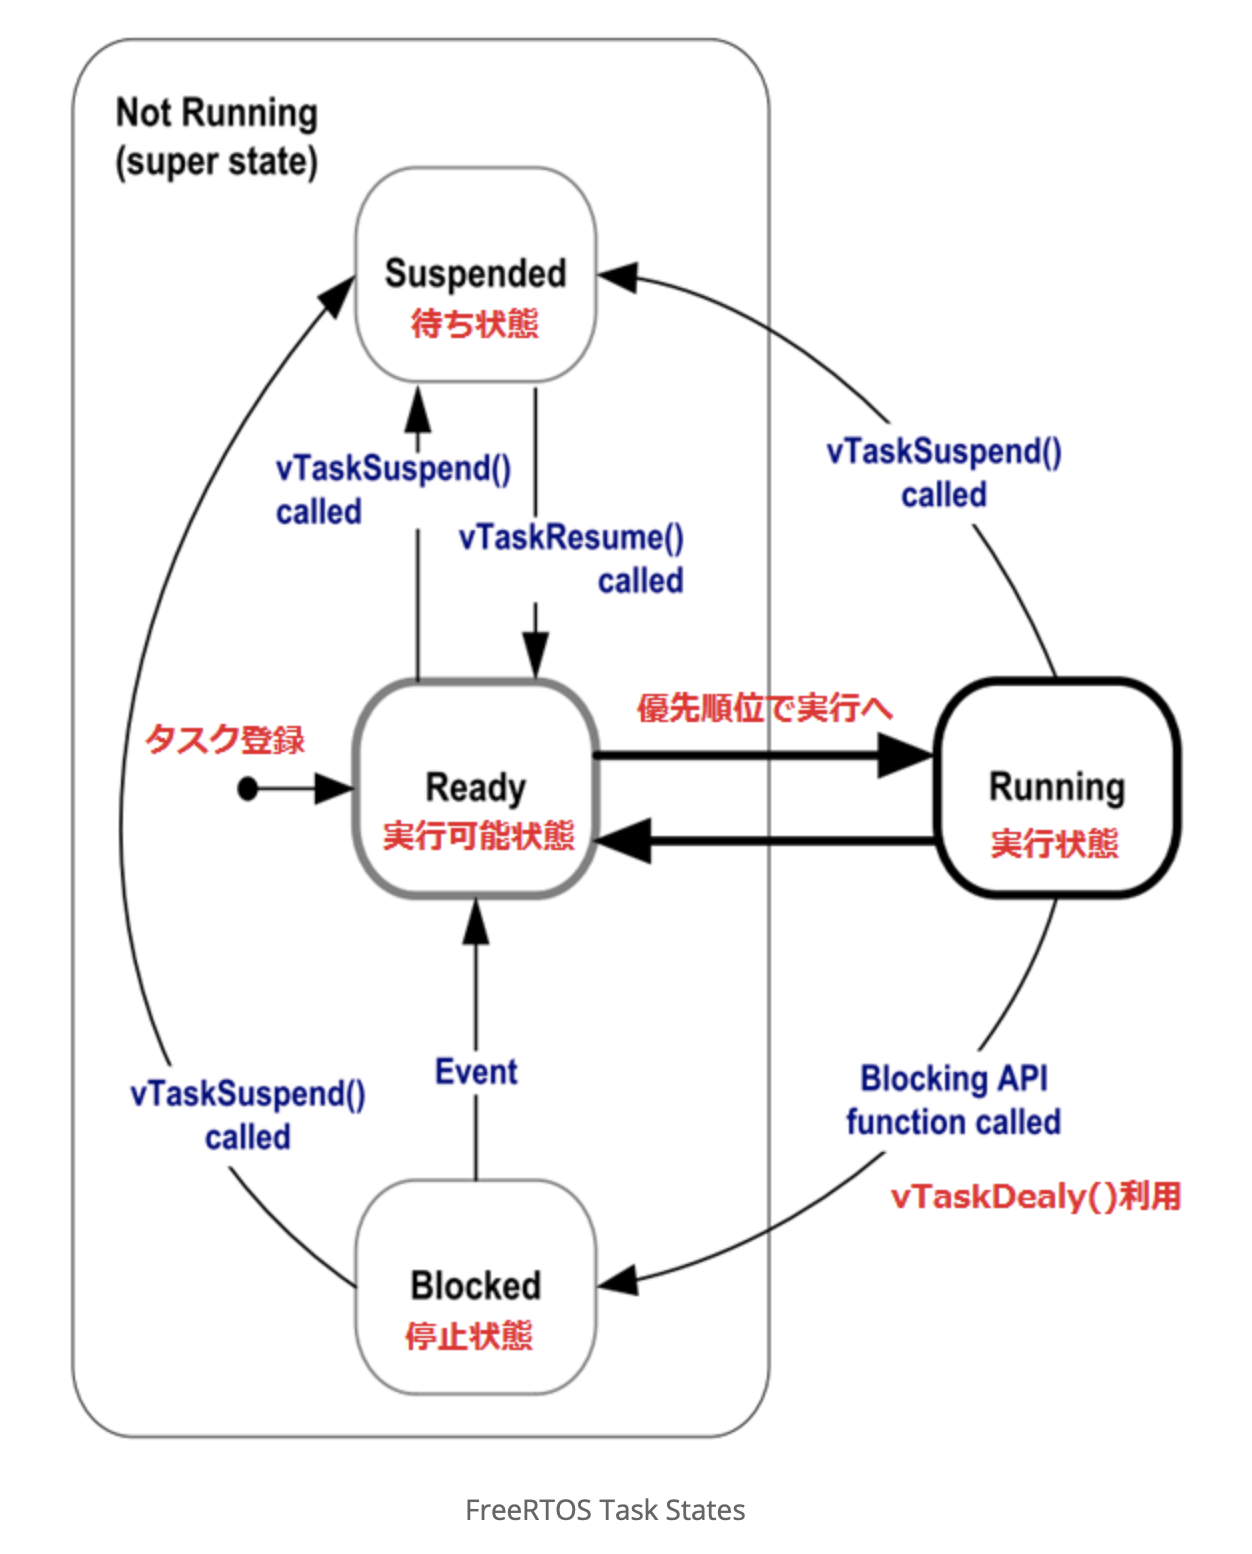
1. タスク遷移図

http://happytech.jp/wordpress/2017/02/25/rtos-for-iot-mcu-task-control/

に分かりやすい図があったので借用。

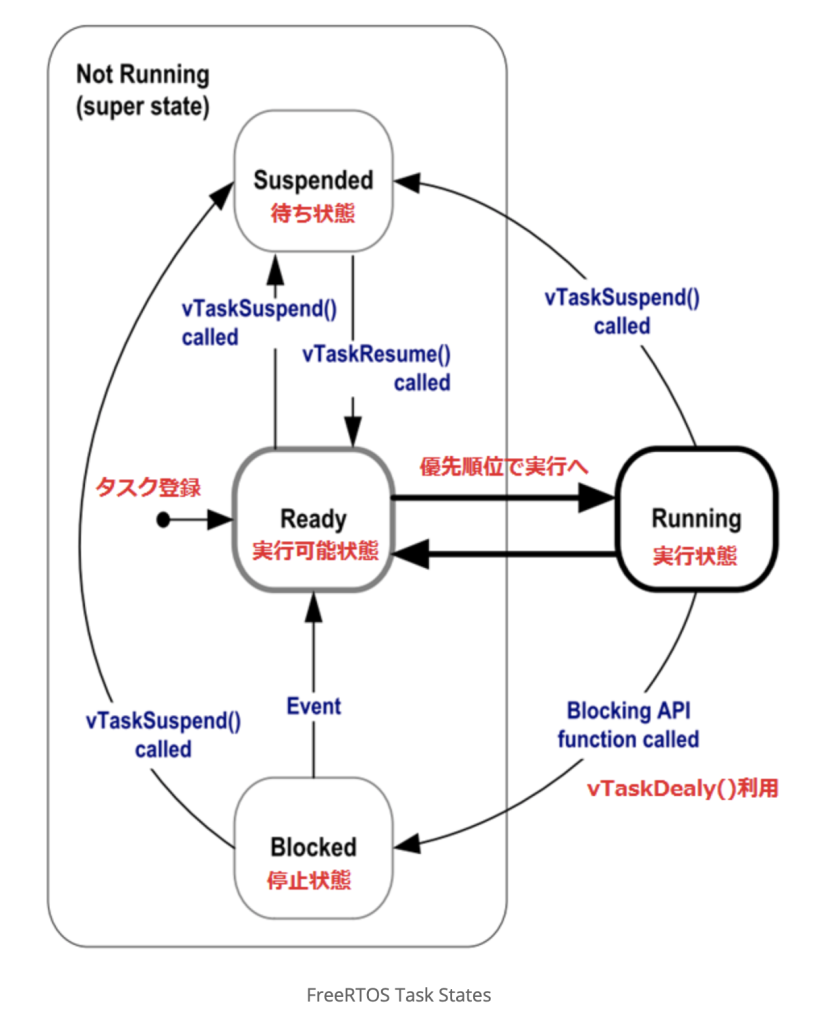
タスク中で時間待ちdelay()させてもタスクは実行権は手放さないので、他のタスクは動作できず、設定した時間だけ停止状態に入るvTaskDelay()関数が必要になります。この場合のEventとはタイムアウトになりますね。


2. タスク間通信

いろんな手法が存在しますが、queueを使うのが一番使いやすそうなので使ってみます。queueとは分かりやすく言えばFIFOです。最も軽量で使えるのはTask Notificationsのようですが、汎用性はqueueのほうがあります。

① queueの作成

1行目のxQueueCreate()でqueueの作成(定義)を行います。

QueueHandle_t xQueue = xQueueCreate( 10, sizeof( unsigned long ) );

最初ループ処理の内側に入れてたので、メモリが枯渇してMalloc errorが出ました。領域確保は当然一回だけ必要です。

② 送信側

14行目のxQueueSend()でqueueにデータを送り込みます。

xStatus = xQueueSend(xQueue, &SendValue, 0);


③ 受信側

47行目のxStatus = xQueueReceive()でqueueからデータを取り出します。

xStatus = xQueueReceive(xQueue, &ReceivedValue, xTicksToWait);


QueueHandle_t xQueue = xQueueCreate( 10, sizeof( unsigned long ) );
void threadA( void *pvParameters ) 
{
  int32_t SendValue = 0;
  BaseType_t xStatus;
  SERIAL.println("Thread A: Started");
  while(1){
  //for(int x=0; x<100; ++x)
  //{
    //SERIAL.print("A");
    //SERIAL.flush();
    web_server();
    ++SendValue;
    xStatus = xQueueSend(xQueue, &SendValue, 0);
         if(xStatus != pdPASS) // send error check
         {
             while(1)
             {
                 Serial.println("rtos queue send error, stopped");
                 delay(1000);
             }
         }
    myDelayMs(2000);
  //}
  
  // delete ourselves.
  // Have to call this or the system crashes when you reach the end bracket and then get scheduled.
  //vTaskDelete( Handle_bTask );
  }
  SERIAL.println("Thread A: Deleting");
  vTaskDelete( NULL );
}

//*****************************************************************
// Create a thread that prints out B to the screen every second
// this task will run forever
//*****************************************************************
void threadB( void *pvParameters ) 
{ 
  BaseType_t xStatus;
  int32_t ReceivedValue = 0;
  const TickType_t xTicksToWait = 500U;
  SERIAL.println("Thread B: Started");

  while(1){
      distance=s_sensor();
      xStatus = xQueueReceive(xQueue, &ReceivedValue, xTicksToWait);

      //Serial.println("check if data is received");

      if(xStatus == pdPASS) // receive error check
         {
             Serial.print("received data : ");
             Serial.println(ReceivedValue);
         }
      else{
        Serial.println("No data available");
      }
      /*
         {
             if(uxQueueMessagesWaiting(xQueue) != 0)
             {
                 while(1)
                 {
                     Serial.println("rtos queue receive error, stopped");
                     delay(1000);
                 }
             }
         }
         */
    //SERIAL.println("B");
    SERIAL.flush();
    myDelayMs(500);
  }
}

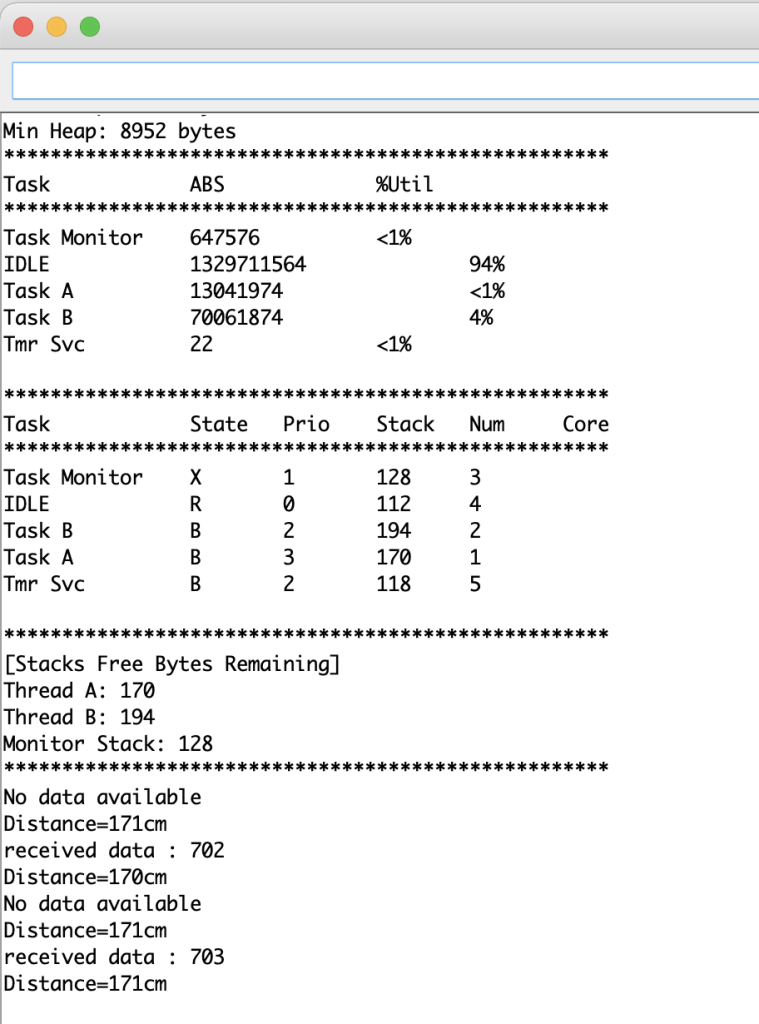
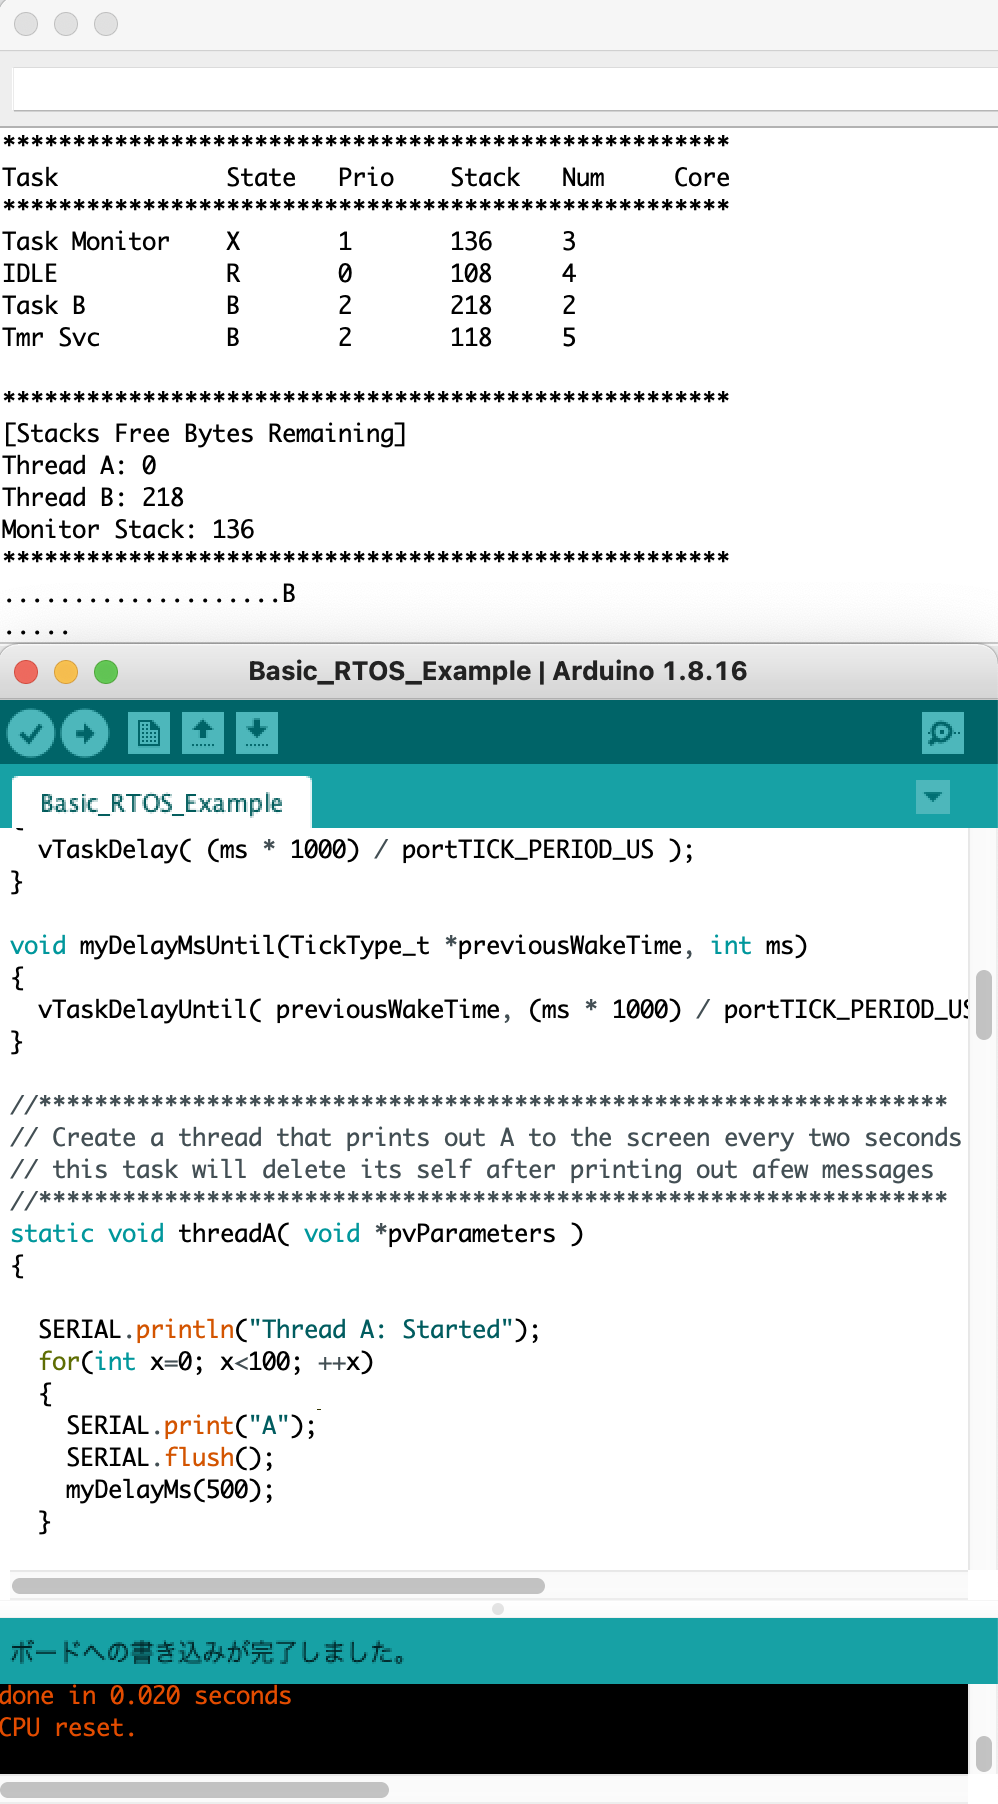
動作させると以下のシリアルポート出力になります。queueに存在しなければ存在しないよと出力してます。既にthreadAとthreadBでwebサーバーと距離センサー機能の呼び出しをおこなっているので、実用的なマルチタスクに一歩前進。

モニタータスクはリソースの解放忘れなどのチェック用に開発期間中は削除できないでしょう。


admin

FreeRTOSを動かしてみる

FreeRTOSの基本構造の理解のために、サンプルを素材にして色々いじってみることにします。

以下は

FreeRTOS_SAMD21のライブラリ中に含まれるサンプルプログラム(Basic_RTOS_Example)のソースコード全てです。

① タスクの定義

27~29行目でグローバル変数でタスク定義をしています。

TaskHandle_t Handle_aTask;
TaskHandle_t Handle_bTask;
TaskHandle_t Handle_monitorTask;


② タスクの記述

例えば、57行目で以下のような書式で定義しますが、なぜstaticなのかは今の段階では不明。タスク生成にxTaskCreateStatic()メソッドがあるから関連ありそうですが、xTaskCreateメソッドでStaticのあるなしでタスクスタック領域の確保の仕方が変わるようなので、一般的にはstaticにすることでタスクでも何らかのリソース割り当て方法が変わってくるはず。
static void threadA( void *pvParameters )


③ タスクの作成と起動

200~202行目のvoid setup()関数中で作成して205行目で起動しています。

xTaskCreate(threadA, “Task A”, 256, NULL, tskIDLE_PRIORITY + 3, &Handle_aTask);
xTaskCreate(threadB, “Task B”, 256, NULL, tskIDLE_PRIORITY + 2, &Handle_bTask);
xTaskCreate(taskMonitor, “Task Monitor”, 256, NULL, tskIDLE_PRIORITY + 1, &Handle_monitorTask);
205行目
vTaskStartScheduler();


④ タスクの終了

自分自身を終了させるときは、nullを引数に指定してvTaskDelete()を呼び出し。(71行目)

SERIAL.println(“Thread A: Deleting”);
vTaskDelete( NULL );
他のタスクを終了させるときには、例えば
vTaskDelete( Handle_bTask );
のように、タスク定義で使用したグローバル変数名を使います。
//**************************************************************************
// FreeRtos on Samd21
// By Scott Briscoe
//
// Project is a simple example of how to get FreeRtos running on a SamD21 processor
// Project can be used as a template to build your projects off of as well
//
//**************************************************************************

#include 

//**************************************************************************
// Type Defines and Constants
//**************************************************************************

#define  ERROR_LED_PIN  13 //Led Pin: Typical Arduino Board
//#define  ERROR_LED_PIN  2 //Led Pin: samd21 xplained board

#define ERROR_LED_LIGHTUP_STATE  HIGH // the state that makes the led light up on your board, either low or high

// Select the serial port the project should use and communicate over
// Some boards use SerialUSB, some use Serial
#define SERIAL          SerialUSB //Sparkfun Samd21 Boards
//#define SERIAL          Serial //Adafruit, other Samd21 Boards

//**************************************************************************
// global variables
//**************************************************************************
TaskHandle_t Handle_aTask;
TaskHandle_t Handle_bTask;
TaskHandle_t Handle_monitorTask;

//**************************************************************************
// Can use these function for RTOS delays
// Takes into account processor speed
// Use these instead of delay(...) in rtos tasks
//**************************************************************************
void myDelayUs(int us)
{
  vTaskDelay( us / portTICK_PERIOD_US );  
}

void myDelayMs(int ms)
{
  vTaskDelay( (ms * 1000) / portTICK_PERIOD_US );  
}

void myDelayMsUntil(TickType_t *previousWakeTime, int ms)
{
  vTaskDelayUntil( previousWakeTime, (ms * 1000) / portTICK_PERIOD_US );  
}

//*****************************************************************
// Create a thread that prints out A to the screen every two seconds
// this task will delete its self after printing out afew messages
//*****************************************************************
static void threadA( void *pvParameters ) 
{
  
  SERIAL.println("Thread A: Started");
  for(int x=0; x<100; ++x)
  {
    SERIAL.print("A");
    SERIAL.flush();
    myDelayMs(500);
  }
  
  // delete ourselves.
  // Have to call this or the system crashes when you reach the end bracket and then get scheduled.
  SERIAL.println("Thread A: Deleting");
  vTaskDelete( NULL );
}

//*****************************************************************
// Create a thread that prints out B to the screen every second
// this task will run forever
//*****************************************************************
static void threadB( void *pvParameters ) 
{
  SERIAL.println("Thread B: Started");

  while(1)
  {
    SERIAL.println("B");
    SERIAL.flush();
    myDelayMs(2000);
  }

}

//*****************************************************************
// Task will periodically print out useful information about the tasks running
// Is a useful tool to help figure out stack sizes being used
// Run time stats are generated from all task timing collected since startup
// No easy way yet to clear the run time stats yet
//*****************************************************************
static char ptrTaskList[400]; //temporary string buffer for task stats

void taskMonitor(void *pvParameters)
{
    int x;
    int measurement;
    
    SERIAL.println("Task Monitor: Started");

    // run this task afew times before exiting forever
    while(1)
    {
    	myDelayMs(10000); // print every 10 seconds

    	SERIAL.flush();
		SERIAL.println("");			 
    	SERIAL.println("****************************************************");
    	SERIAL.print("Free Heap: ");
    	SERIAL.print(xPortGetFreeHeapSize());
    	SERIAL.println(" bytes");

    	SERIAL.print("Min Heap: ");
    	SERIAL.print(xPortGetMinimumEverFreeHeapSize());
    	SERIAL.println(" bytes");
    	SERIAL.flush();

    	SERIAL.println("****************************************************");
    	SERIAL.println("Task            ABS             %Util");
    	SERIAL.println("****************************************************");

    	vTaskGetRunTimeStats(ptrTaskList); //save stats to char array
    	SERIAL.println(ptrTaskList); //prints out already formatted stats
    	SERIAL.flush();

		SERIAL.println("****************************************************");
		SERIAL.println("Task            State   Prio    Stack   Num     Core" );
		SERIAL.println("****************************************************");

		vTaskList(ptrTaskList); //save stats to char array
		SERIAL.println(ptrTaskList); //prints out already formatted stats
		SERIAL.flush();

		SERIAL.println("****************************************************");
		SERIAL.println("[Stacks Free Bytes Remaining] ");

		measurement = uxTaskGetStackHighWaterMark( Handle_aTask );
		SERIAL.print("Thread A: ");
		SERIAL.println(measurement);

		measurement = uxTaskGetStackHighWaterMark( Handle_bTask );
		SERIAL.print("Thread B: ");
		SERIAL.println(measurement);

		measurement = uxTaskGetStackHighWaterMark( Handle_monitorTask );
		SERIAL.print("Monitor Stack: ");
		SERIAL.println(measurement);

		SERIAL.println("****************************************************");
		SERIAL.flush();

    }

    // delete ourselves.
    // Have to call this or the system crashes when you reach the end bracket and then get scheduled.
    SERIAL.println("Task Monitor: Deleting");
    vTaskDelete( NULL );

}


//*****************************************************************

void setup() 
{

  SERIAL.begin(115200);

  delay(1000); // prevents usb driver crash on startup, do not omit this
  while (!SERIAL) ;  // Wait for serial terminal to open port before starting program

  SERIAL.println("");
  SERIAL.println("******************************");
  SERIAL.println("        Program start         ");
  SERIAL.println("******************************");
  SERIAL.flush();

  // Set the led the rtos will blink when we have a fatal rtos error
  // RTOS also Needs to know if high/low is the state that turns on the led.
  // Error Blink Codes:
  //    3 blinks - Fatal Rtos Error, something bad happened. Think really hard about what you just changed.
  //    2 blinks - Malloc Failed, Happens when you couldn't create a rtos object. 
  //               Probably ran out of heap.
  //    1 blink  - Stack overflow, Task needs more bytes defined for its stack! 
  //               Use the taskMonitor thread to help gauge how much more you need
  vSetErrorLed(ERROR_LED_PIN, ERROR_LED_LIGHTUP_STATE);

  // sets the serial port to print errors to when the rtos crashes
  // if this is not set, serial information is not printed by default
  vSetErrorSerial(&SERIAL);

  // Create the threads that will be managed by the rtos
  // Sets the stack size and priority of each task
  // Also initializes a handler pointer to each task, which are important to communicate with and retrieve info from tasks
  xTaskCreate(threadA,     "Task A",       256, NULL, tskIDLE_PRIORITY + 3, &Handle_aTask);
  xTaskCreate(threadB,     "Task B",       256, NULL, tskIDLE_PRIORITY + 2, &Handle_bTask);
  xTaskCreate(taskMonitor, "Task Monitor", 256, NULL, tskIDLE_PRIORITY + 1, &Handle_monitorTask);

  // Start the RTOS, this function will never return and will schedule the tasks.
  vTaskStartScheduler();

  // error scheduler failed to start
  // should never get here
  while(1)
  {
	  SERIAL.println("Scheduler Failed! \n");
	  SERIAL.flush();
	  delay(1000);
  }

}

//*****************************************************************
// This is now the rtos idle loop
// No rtos blocking functions allowed!
//*****************************************************************
void loop() 
{
    // Optional commands, can comment/uncomment below
    SERIAL.print("."); //print out dots in terminal, we only do this when the RTOS is in the idle state
    SERIAL.flush();
    delay(100); //delay is interrupt friendly, unlike vNopDelayMS
}


//*****************************************************************

動作させてみた写真は以下の通りです。既にthreadAは終了してしまってます。スタック領域が枯渇しているので、リソース解放抜けがありそうです。

まだいくつか必須の機能はありますが追々と確認していきます。

FreeRTOSのAPIドキュメントはこちらから。

https://www.freertos.org/a00106.html


admin

FreeRTOS

やはりシングルタスクではアプリ作りづらい(作れない)ので、リアルタイムOSを導入してみようと思う。

使うのはタスクスケジューラーとメッセージ機能ぐらいだろうけど、これが使えれば十分。

プロセッサ系でArduino MKR WiFi 1010もサポート対象のようだから、ライブラリだけインストールしてみた。まずは簡単な機能で動作確認してみることから始めます。

<追記>

サンプル動かそうとするとavr/io.h見つからないとコンパイルエラー、何故かなと思ったらArduino MKR WiFi 1010はCPUがSAMD21系だからライブラリが違う。適切なライブラリをインストールして、不要なライブラリはディレクトリから削除してIDEを再立ち上げすると大丈夫そうです。


admin