LCDの動作確認のためにArduino IDEで動作確認(受入試験みたいなもので以下のリンク)しましたが、Cのライブラリ使わないとスペアナ計算と結合できないのでpico-sdk使ってやってみます
https://isehara-3lv.sakura.ne.jp/blog/2025/06/20/ラズピコでspiバス経由でlcd表示させる/
ライブラリは使い方がシンプルなので構造が単純な以下を使います
https://github.com/Imel23/lcd-st7789-library
ライブラリを使う時には、ハードワイヤリングの設定をソース上で行うこととSPIの動作モードを指定しないと動作しなかった(以下変更部分のコード)、それ以外には画面ローテーションの指定もしています、この記事の最後の方に記載
SPI clockは62.5MHzのままだと動作に不安があるので20MHzまで落としてます、どうせ62.5MHzでも最初の電源オンのチラつき(データが初期状態では不定だから)はあるから、バックライト信号の制御がいずれ必要
// Pin definitions for the LCD connection
//#define BL_PIN 13 // Backlight pin
#define DC_PIN 20   // Data/Command pin
#define RST_PIN 21  // Reset pin
#define MOSI_PIN 19 // SPI MOSI pin
#define SCK_PIN 18  // SPI Clock pin
#define CS_PIN 17   // Chip Select pin

// SPI configuration
#define SPI_PORT spi0
#define SPI_BAUDRATE 2000000  // 62.5 MHz SPI clock

// Function prototypes for internal use
static void lcd_write_command(uint8_t cmd);
static void lcd_write_data(uint8_t data);
static void lcd_set_window(uint16_t x1, uint16_t y1, uint16_t x2, uint16_t y2);

// Initialize the LCD
void lcd_init() {
    // Initialize SPI
    spi_init(SPI_PORT, SPI_BAUDRATE);
    spi_set_format(SPI_PORT, 8, SPI_CPOL_1, SPI_CPHA_1, SPI_MSB_FIRST);     // to add this line
ライブラリ用にcmakeファイルに設定を追加して、現状の中身は、
# Generated Cmake Pico project file
cmake_minimum_required(VERSION 3.13)
set(CMAKE_C_STANDARD 11)
set(CMAKE_CXX_STANDARD 17)
set(CMAKE_EXPORT_COMPILE_COMMANDS ON)
# Initialise pico_sdk from installed location
# (note this can come from environment, CMake cache etc)
# == DO NOT EDIT THE FOLLOWING LINES for the Raspberry Pi Pico VS Code Extension to work ==
if(WIN32)
set(USERHOME $ENV{USERPROFILE})
else()
set(USERHOME $ENV{HOME})
endif()
set(sdkVersion 2.1.1)
set(toolchainVersion 14_2_Rel1)
set(picotoolVersion 2.1.1)
#set(picoVscode ${USERHOME}/.pico-sdk/cmake/pico-vscode.cmake)
#if (EXISTS ${picoVscode})
# include(${picoVscode})
#endif()
# ====================================================================================
set(PICO_BOARD pico2_w CACHE STRING "Board type")
set(PICO_SDK_PATH "$ENV{HOME}/pi/pico/pico-sdk")
#set(PICO_SDK_PATH "/Users/usamiryuuichi/pi/pico/pico-sdk")
# Pull in Raspberry Pi Pico SDK (must be before project)
include(pico_sdk_import.cmake)
project(dsp C CXX ASM)
# Initialise the Raspberry Pi Pico SDK
pico_sdk_init()
# Create a library for the LCD driver
add_library(lcd_driver STATIC
lcd_st7789_library.c
font_5x7.c
)
add_library(CMSISDSP STATIC IMPORTED GLOBAL)
set_target_properties(CMSISDSP PROPERTIES IMPORTED_LOCATION
$ENV{HOME}/pi/pico/CMSISDSP/build/bin_dsp/libCMSISDSP.a)
#target_link_libraries(dsp CMSISDSP ...)
# Add executable. Default name is the project name, version 0.1
add_executable(dsp dsp.c )
pico_set_program_name(dsp "dsp")
pico_set_program_version(dsp "0.1")
# Modify the below lines to enable/disable output over UART/USB
pico_enable_stdio_uart(dsp 0)
pico_enable_stdio_usb(dsp 1)
# Add the standard library to the build
target_link_libraries(dsp
pico_stdlib
pico_multicore
hardware_adc
hardware_dma
hardware_pio
hardware_pwm
hardware_spi
CMSISDSP
lcd_driver
hardware_timer
pico_multicore
)
target_link_libraries(lcd_driver
pico_stdlib
hardware_spi
)
# Add the standard include files to the build
target_include_directories(dsp PRIVATE
${CMAKE_CURRENT_LIST_DIR}
$ENV{HOME}/pi/pico/CMSISDSP/CMSIS-DSP/Include
$ENV{HOME}/pi/pico/CMSISDSP/CMSIS_6/CMSIS/Core/Include
${PICO_SDK_PATH}/src/rp2
)
target_include_directories(lcd_driver PRIVATE
${CMAKE_CURRENT_LIST_DIR}
${PICO_SDK_PATH}/src/common
${PICO_SDK_PATH}/src/rp2
)
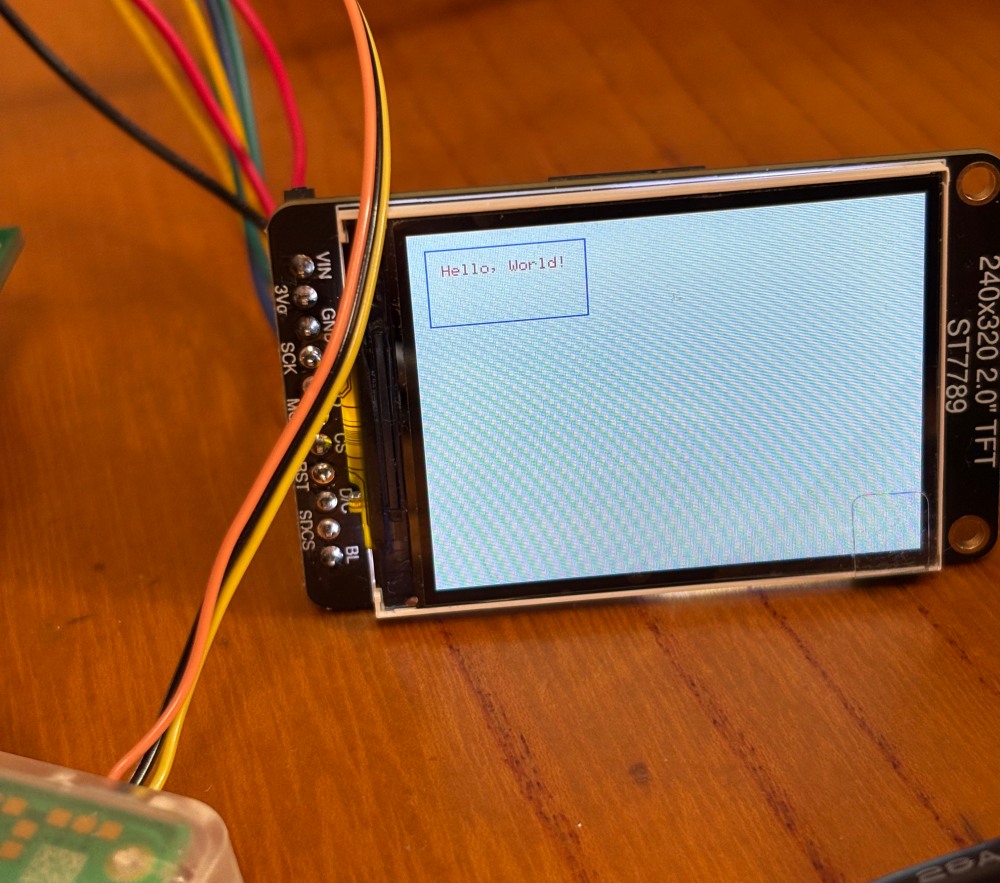
pico_add_extra_outputs(dsp)ディレクトリ構成は、
スペアナのコードに追加したのは、動作確認のためだけですが、
// core1 will be used for LCD display control
#include "pico/stdlib.h"
#include "lcd_st7789_library.h"
#include "hardware/spi.h"

void core1_main()
{
    // Initialize the LCD
    lcd_init();

    // Fill the screen
    lcd_fill_color(create_color(255, 255, 255));

    // Draw a rectangle
    lcd_draw_rect(10, 10, 100, 50, create_color(0, 0, 255));

    // Draw some text
    lcd_draw_text(20, 20, "Hello, World!", create_color(255, 0, 0), create_color(255, 255, 255), 1); // char color, bg color, font size

    while (1)
    {

    }
}
実行結果は、
ローテーション指定はライブラリ中のここで、関数もあるようですが関数で後から指定すると表示が二重になった
    lcd_write_command(0x36);  // Memory Data Access Control
    lcd_write_data(0xA0);     // display rotation
admin