突然死したので新規購入、電源ONでboot upしなくなりました、緑LEDが点灯しっぱなし状態
SDカード、USB SSDどちらも媒体にアクセスしに行かない
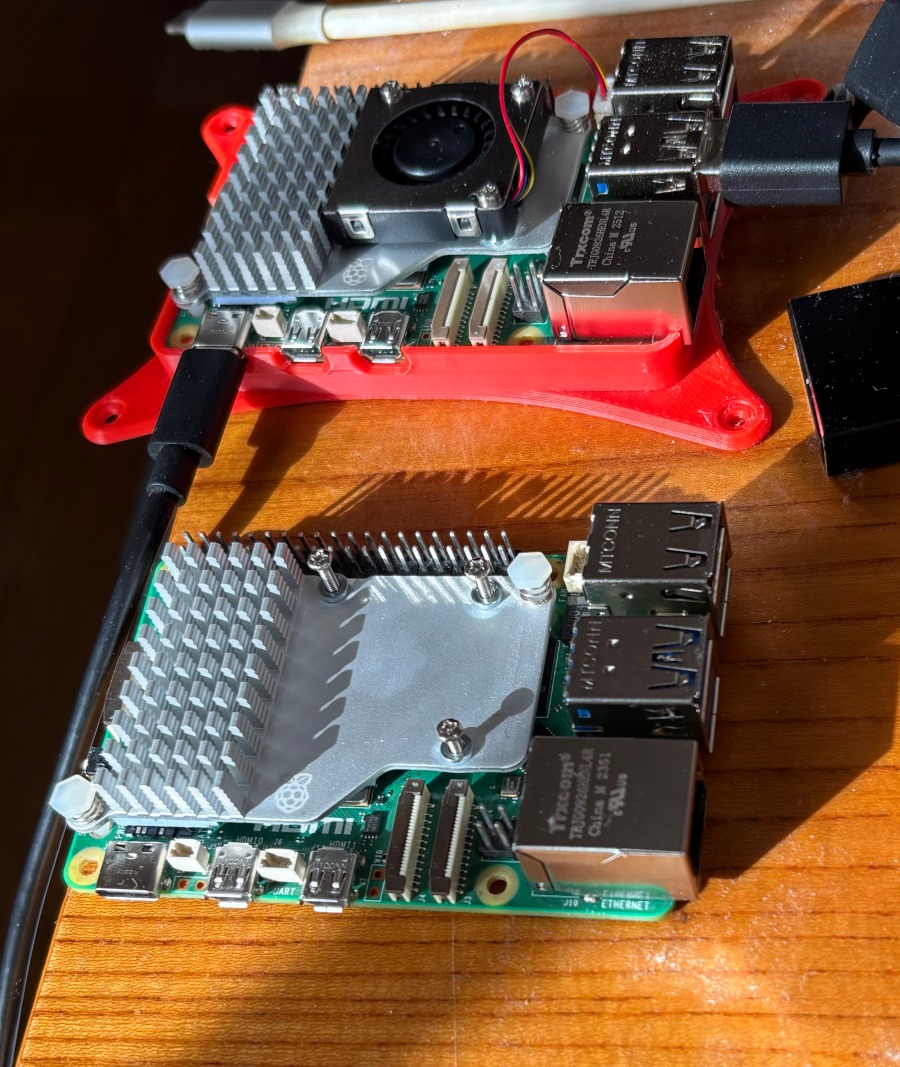
下が壊れたラズパイ5、上が購入品、冷却ファンだけは使い回しできそうなので外して保存しときます、サーマルパッドは一度外すと新規に取り付けしないと期待した性能にはならないだろうし
しかし去年の一月末購入で24時間かどうでもないのに逝ってしまうのはハズレだったんだろうね
admin

la vie libre
突然死したので新規購入、電源ONでboot upしなくなりました、緑LEDが点灯しっぱなし状態
SDカード、USB SSDどちらも媒体にアクセスしに行かない
下が壊れたラズパイ5、上が購入品、冷却ファンだけは使い回しできそうなので外して保存しときます、サーマルパッドは一度外すと新規に取り付けしないと期待した性能にはならないだろうし
しかし去年の一月末購入で24時間かどうでもないのに逝ってしまうのはハズレだったんだろうね
admin
実現する形態、
<ラズピコ5はサーバー運用>
・Luantiサーバー(ユーザー接続はtailscaleを使う)
・管理者:サーバー運用とユーザー管理
・一般ユーザー:ユーザーごとにLuantiサーバーを起動、つまり個別のワールドを持てる様にして、デスクトップも分離させて持たせる
<目的に合いそうなVNCサーバー>
TigerVNCがピッタリ感
tigervncのインストール、
$ sudo apt install tigervnc-standalone-server tigervnc-common -y

アカウント(luanti1)を作る、

$ sudo adduser luanti1

$ groups luanti1
luanti1 : luanti1 users

$ tigervncpasswd // tigervncのpw設定する(tigervnc login時必要)
<設定ファイル:サービスの定義>
luanti1@rasp5:~ $ cat ~/.config/systemd/user/tigervnc@.service
[Unit]
Description=TigerVNC Server
After=network.target

# direct to the user directory
[Service]
Type=forking
ExecStartPre=/bin/rm -f /home/luanti1/.vnc/%H:%i.pid

ExecStart=/usr/bin/tigervncserver %i -geometry 1280x800 -localhost no -SecurityTypes VncAuth,TLSVnc -xstartup /home/luanti1/.vnc/xstartup

ExecStop=/usr/bin/tigervncserver -kill %i
Restart=on-failure

[Install]
WantedBy=default.target
<設定ファイル:サービス起動設定>
luanti1@rasp5:~ $ cat ~/.vnc/xstartup

#!/bin/bash
unset SESSION_MANAGER
unset DBUS_SESSION_BUS_ADDRESS
exec dbus-launch --exit-with-session startlxde-pi
<ブート時自動起動の設定>
ユーザごとにログインして以下を実行する、
サーバーでboot時に有効にするなら、
# linger有効化(一般ユーザでやれば他人は変更できないからそれがお勧め)
$ loginctl enable-linger username        // usernameは実際のユーザ名(ここではpi)に置き換え
# userサービス enable
$ systemctl --user enable tigervnc@:1
# 今すぐ起動
$ systemctl --user start tigervnc@:1

ステータス確認、
$ systemctl --user status tigervnc@:1
● tigervnc@:1.service - TigerVNC Server
~~以下略

 $ ss -tlnp | grep 5901
LISTEN 0      5                          0.0.0.0:5901       0.0.0.0:*    users:(("Xtigervnc",pid=203908,fd=7))
LISTEN 0      5                             [::]:5901          [::]:*    users:(("Xtigervnc",pid=203908,fd=8))
tigervnc@:1はそのユーザーの仮想画面番号を指定する
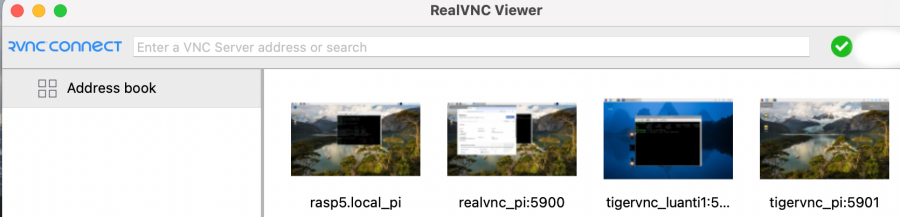
VNCクライアントの管理画面はこんな感じ、
・LAN内のアクセスは禁止している
・予備のためにRealVNC(port 5900:piのみ接続可能)は活かしてある
・TigerVNCの画面はport 5901(pi用)/5902(luanti1用)を用意してある
以上で複数ユーザーがユーザーごとにLuantiサーバーの起動とデスクトップ画面の使用できる様な環境設定を完了、sshも許可してるからそれは非常用かな
admin
以前設定したつもりになってたけど、実は設定されてなかったufwをインストールから順を追って記録
ufwというのは実はiptablesのラッパー機能になっていて、見え方をわかりやすくしたものと思えば良いのでしょうね
インストールから設定までのコマンドの使い方、tailscaleでの限定開放の例です、この様に指定するとLAN内の接続要求はリジェクトされます
$ sudo apt install ufw -y

ポート解放設定
$ sudo ufw allow in on tailscale0 to any port 22 proto tcp
$ sudo ufw allow in on tailscale0 proto tcp to any port 5900:5910

$ sudo ufw default deny incoming
$ sudo ufw default allow outgoing

$ sudo ufw enable	// set to active

 $ sudo ufw status
Status: active

To                         Action      From
--                         ------      ----
22/tcp on tailscale0       ALLOW       Anywhere
5900:5910/tcp on tailscale0 ALLOW       Anywhere
22/tcp (v6) on tailscale0  ALLOW       Anywhere (v6)
5900:5910/tcp (v6) on tailscale0 ALLOW       Anywhere (v6)


$ sudo ufw status numbered
Status: active

     To                         Action      From
     --                         ------      ----
[ 1] 22/tcp on tailscale0       ALLOW IN    Anywhere
[ 2] 5900:5910/tcp on tailscale0 ALLOW IN    Anywhere
[ 3] 22/tcp (v6) on tailscale0  ALLOW IN    Anywhere (v6)
[ 4] 5900:5910/tcp (v6) on tailscale0 ALLOW IN    Anywhere (v6)
不要なルールの削除
$ sudo ufo delete n(番号、複数削除するときは上位番号から削除する若い番号から消すと順序が乱れるだろうから、最上位側から消すのが普通と思う
サーバーであればポート開放を限定的にするのはほぼ必須です、tailscaleを使っているので、それと合わせてアクセス制限は二重化されています
admin
tailscale自体はtailnet以外からのアクセスに対しては強固ですが、前の記事で述べた通りいくつか考慮すべきポイントがあります
その中でもクライアント同士(特にユーザクライアントから管理クライアント)でアクセスできてしまうというのは避けなければいけない項目でしょう
そのための設定がACLです、tailscaleの管理画面で、”Access controls”のjsonファイルに以下のように書き込んで、クライアントからサーバーへのアクセスだけ許可します、ここで許可した以外は全部deny扱いなのでクライアント間は完全分離です
	"groups": {
		"group:admin":   ["user@gmail.com"],
		"group:players": ["user@gmail.com"],
	},
	// Define the tags which can be applied to devices and by which users.
	// "tagOwners": {
	//  	"tag:example": ["autogroup:admin"],
	// },
	"tagOwners": {
		"tag:luanti-server": ["group:admin"],
	},
	// Define grants that govern access for users, groups, autogroups, tags,
	// Tailscale IP addresses, and subnet ranges.
	"acls": [
		{
			"action": "accept",
			"src":    ["group:players"],
			"dst": [
				"tag:luanti-server:30000-30010",
				"tag:luanti-server:22",
				"tag:luanti-server:5901",
			],
		},
	],
jsonファイルを編集してセーブすると、Machinesの選択メニューでEdit ACL tagsが現れて、これを選択するとデバイスにタグ付できます
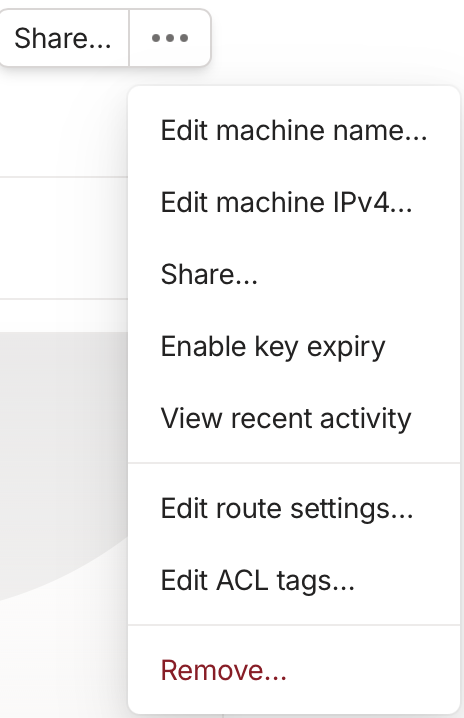
タグ付すると、
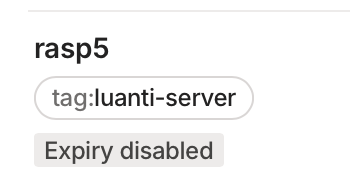
のようにmachinesのデバイス名の下にtag表示されるようになりますから、このタグがACL設定の"tag:luanti-server": ["group:admin"]と合致してアクセス(フロー)制御が実行できます
ラズパイ5のufw設定(使うポートだけ許可する)と、unattended-upgradesを使った自動セキュリティアップデートも追加しておきます
tailscaleのfree版だとアクセスの権限制限設定できないけれども、身内の運用ならばあえて管理画面のことは伝えずに運用だね
admin
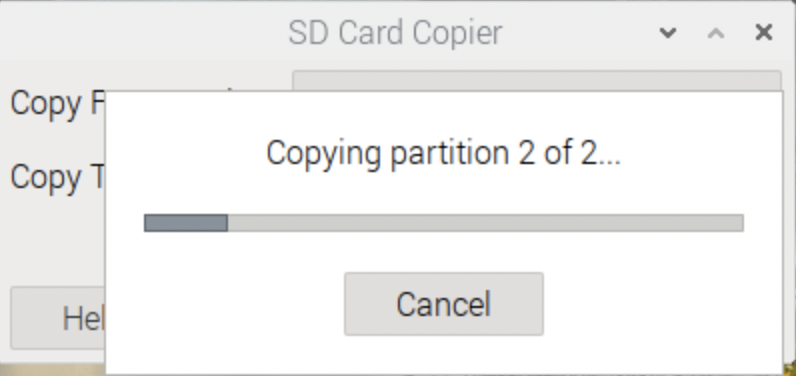
以前の記事でNVMeのSSDにした記事掲載しましたが、どうも安定して動作しないので結局SDカードに戻してましたが、今回USBのSATA SSDのケース買ってそこにイメージ写してシステムデスク(128GB SATA SSD)を変更してみた
<SDカードをUSB SSD化する>
SD Card Copierで丸ごとコピー(New Partition UUIDsにチェック忘れずに)
再起動で、
・boot orderの確認
pi@rasp5:~ $ sudo rpi-eeprom-config
[all]
BOOT_UART=1
POWER_OFF_ON_HALT=0
BOOT_ORDER=0xf146 #NVMe / USB / SDカードのオーダー
PCIE_PROBE=1
Sdカードよりも優先順位は高くなっているけど最優先にする
$ sudo rpi-eeprom-config --edit
で変更してrebootで、
$ sudo rpi-eeprom-config
[all]
BOOT_UART=1
POWER_OFF_ON_HALT=0
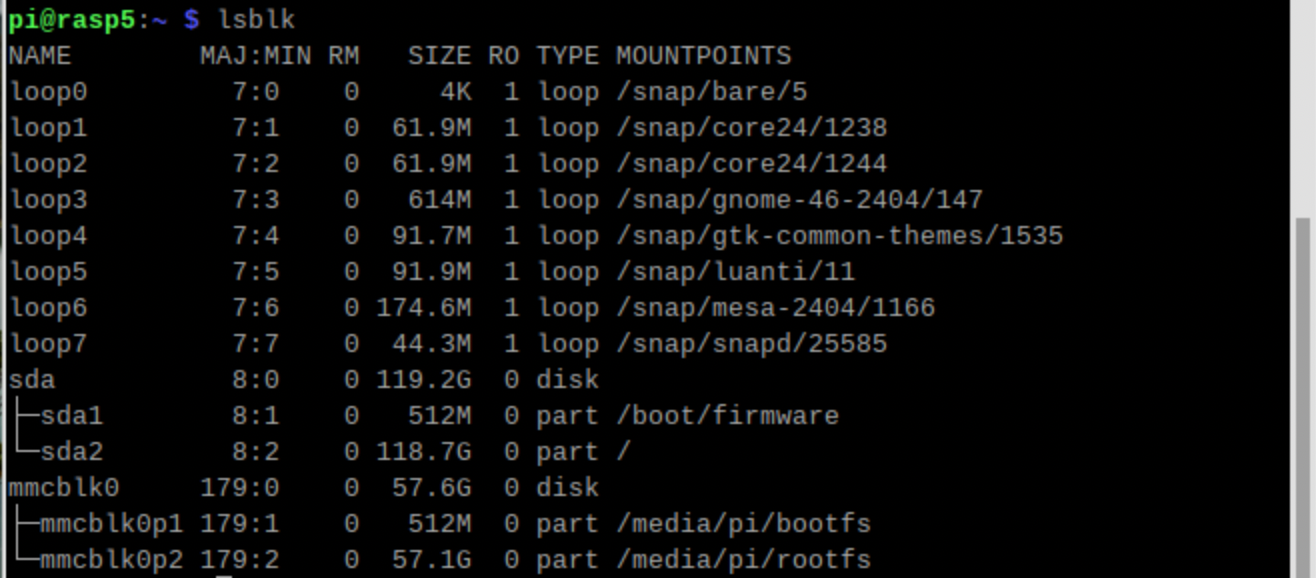
BOOT_ORDER=0xf164
PCIE_PROBE=1SDカードは抜いてないから見えてるけど、USB SSDに切り替わった、loopxはsnapで仮想的にインストールされたモジュールが割り当てされるドライブネームなのでmountpointsは/snapから始まっている
ついでに性能測定、
     Category                  Test                      Result
HDParm                    Disk Read                 361.17 MB/sec
HDParm                    Cached Disk Read          327.60 MB/sec
DD                        Disk Write                292 MB/s
FIO                       4k random read            29510 IOPS (118040 KB/s)
FIO                       4k random write           24323 IOPS (97292 KB/s)
IOZone                    4k read                   44614 KB/s
IOZone                    4k write                  42302 KB/s
IOZone                    4k random read            22563 KB/s
IOZone                    4k random write           44361 KB/s

                          Score: 12810
sdカードに比較して書き込みは一桁上、MVNEe SSDのPCIe接続に比較すると1/3~1/4ぐらい、そんなものかな(以下のリンクは過去記事)
実装はこんな感じ、chatbotのエンビパイプの中に収めてる、
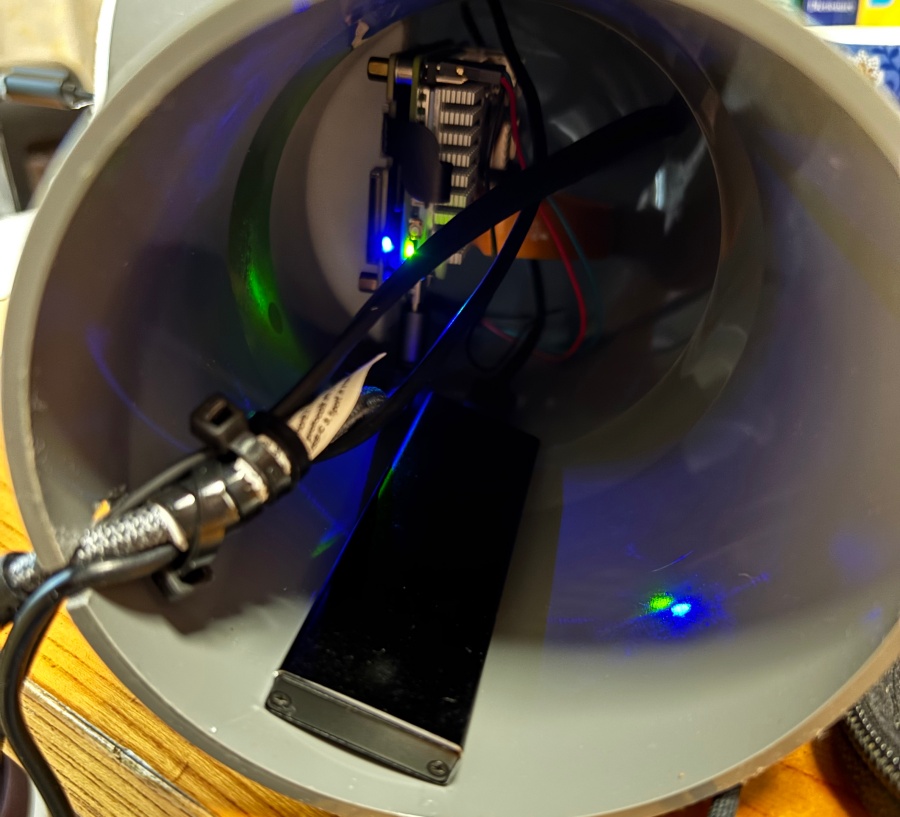
ケースは、
https://www.amazon.co.jp/dp/B0C2D1ZZGW?ref=ppx_yo2ov_dt_b_fed_asin_title
admin
Wi-Fi内でローカルで使うためのLuantiサーバー、色々やってみたけど結局行き着いたのはラズパイ5
① wsl2:一見筋が良さそうだけど、Windowsのセキュリティを乗り越えられない、つまりportが通らない
② USB SSDでLinux:これだとWindows関係なくなるから筋は良さそうなのだけど、HP NoteBookのUEFIのガードが固くてUSB SSDのbootができない、bootableと認識していないということ
③ MacのVMware FusionのUbuntuで立ち上げる:これはMacBookのローカルからだと仲間と認識してもらえるけど、外部からは同様の問題がある、Fusion Proだと同じネットワーク内のアドレス取得されるから良さそうだけど、結局***.localは使えないよね
④ ラズパイ5:これがおそらく一番素直、つまり仮想マシン配下に構築すると必ずネットワークが通すための工夫が必要だけど、専用機なら何ら問題ないしmDNSも使えるから固定I Pである必要もない
<ラズパイ5でのインスト手順>
ここでsnapが出てくる、aptではLunatiが結構古いバージョンだったりするらしくて、最新版を取得するならばsnapを使う、ソースコンパイルという手段もあるけど結構手間ではある
$ sudo apt update
$ sudo apt install snapd

snapとはLinuxにおける新たなパッケージ管理ツール(アプリ単位の隔離で依存関係を全部まとめることでosから切り離されるからaptでインストールできないアプリもインストールできる)、サイズと起動時間がネックかなFlatpakがデスクトップアプリでsnapはサーバーサイドアプリという棲み分けかな、起動時間とか問題なること少ないし
https://www.choge-blog.com/programming/ubuntu-snap/

$ sudo reboot

snapdの最新版をsnapでインストールする
$ sudo snap install snapd

$ sudo snap install luanti

snapのラズパイ用のLuantiはクライアントとサーバーが兼用らしい

$ luantiで起動して作成ずみのworldをDLしてデフォルトに設定する

$ cat ~/snap/luanti/common/.minetest/minetest.conf
server_announce = false
maintab_LAST = online
enable_damage = true
creative_mode = false
mainmenu_last_selected_world = 1
default_game = minetest


$ mkdir -p ~/snap/luanti/common/.minetest/games/
$ cd ~/snap/luanti/common/.minetest/games/
$ git clone https://github.com/luanti-org/minetest_game.git minetest

起動
$ luanti --server --worldname test --gameid minetest --port 30000

2025-12-24 19:33:28: WARNING[Main]: system-wide share not found at "/usr/share/luanti"
2025-12-24 19:33:28: WARNING[Main]: system-wide share found at "/snap/luanti/11/usr/bin/../share/luanti"
2025-12-24 19:33:28: [Main]: Using world specified by --worldname on the command line
2025-12-24 19:33:28: [Main]: Using game specified by --gameid on the command line
 _                   _   _
| |_   _  __ _ _ __ | |_(_)
| | | | |/ _` | '_ \| __| |
| | |_| | (_| | | | | |_| |
|_|\__,_|\__,_|_| |_|\__|_|  ___ 5.14.0
2025-12-24 19:33:28: ACTION[Main]: World at [/home/pi/snap/luanti/common/.minetest/worlds/test]
2025-12-24 19:33:28: ACTION[Main]: Server for gameid="minetest" listening on [::]:30000.
クライアントの画面
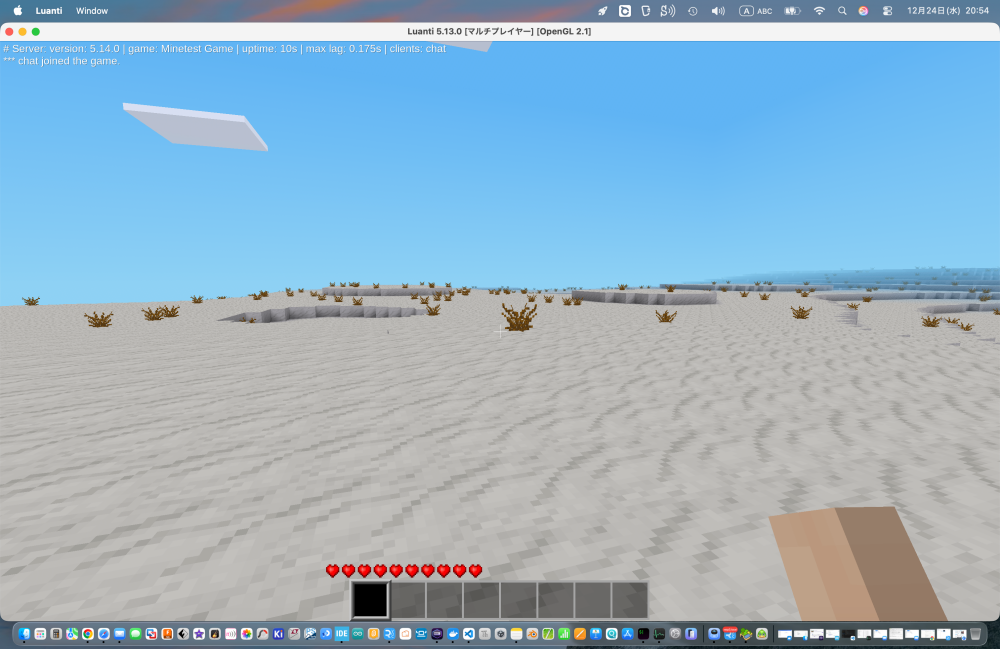
snapは起動時間が長くなるというけど、サーバーなら起動しちまえば終わりだから問題にはならない、sdカード使ってるけど特にレスポンスが遅いとも感じない
あとサイズが大きくなる件は、これは媒体次第だけど今時それほどクリティカルな話ではない
admin
すぐにやり方忘れるので、過去記事に見当たらないので作成
<環境>
MacBook Pro M4/Tahoe
SDカード:ラズパイ5で使っている64GBのSDカード
<手順>
・Macに差し込んでdisk番号の確認
% diskutil list
/dev/disk0 (internal, physical):
   #:                       TYPE NAME                    SIZE       IDENTIFIER
   0:      GUID_partition_scheme                        *1.0 TB     disk0
   1:             Apple_APFS_ISC Container disk1         524.3 MB   disk0s1
   2:                 Apple_APFS Container disk3         994.7 GB   disk0s2
   3:        Apple_APFS_Recovery Container disk2         5.4 GB     disk0s3

/dev/disk3 (synthesized):
   #:                       TYPE NAME                    SIZE       IDENTIFIER
   0:      APFS Container Scheme -                      +994.7 GB   disk3
                                 Physical Store disk0s2
   1:                APFS Volume Macintosh HD            12.2 GB    disk3s1
   2:              APFS Snapshot com.apple.os.update-... 12.2 GB    disk3s1s1
   3:                APFS Volume Preboot                 8.1 GB     disk3s2
   4:                APFS Volume Recovery                1.2 GB     disk3s3
   5:                APFS Volume Data                    455.7 GB   disk3s5
   6:                APFS Volume VM                      5.4 GB     disk3s6

/dev/disk4 (disk image):
   #:                       TYPE NAME                    SIZE       IDENTIFIER
   0:      GUID_partition_scheme                        +17.3 GB    disk4
   1:                 Apple_APFS Container disk5         17.3 GB    disk4s1

/dev/disk5 (synthesized):
   #:                       TYPE NAME                    SIZE       IDENTIFIER
   0:      APFS Container Scheme -                      +17.3 GB    disk5
                                 Physical Store disk4s1
   1:                APFS Volume iOS 17.4 21E213 Simu... 16.8 GB    disk5s1

/dev/disk6 (external, physical):
   #:                       TYPE NAME                    SIZE       IDENTIFIER
   0:      GUID_partition_scheme                        *1.0 TB     disk6
   1:                 Apple_APFS Container disk7         1.0 TB     disk6s1

/dev/disk7 (synthesized):
   #:                       TYPE NAME                    SIZE       IDENTIFIER
   0:      APFS Container Scheme -                      +1.0 TB     disk7
                                 Physical Store disk6s1
   1:                APFS Volume Extreme SSD             370.5 GB   disk7s2

/dev/disk8 (disk image):
   #:                       TYPE NAME                    SIZE       IDENTIFIER
   0:      GUID_partition_scheme                        +17.6 GB    disk8
   1:                 Apple_APFS Container disk9         17.6 GB    disk8s1

/dev/disk9 (synthesized):
   #:                       TYPE NAME                    SIZE       IDENTIFIER
   0:      APFS Container Scheme -                      +17.6 GB    disk9
                                 Physical Store disk8s1
   1:                APFS Volume iOS 17.5 21F79 Simul... 17.0 GB    disk9s1

/dev/disk11 (internal, physical):
   #:                       TYPE NAME                    SIZE       IDENTIFIER
   0:     FDisk_partition_scheme                        *61.9 GB    disk11
   1:             Windows_FAT_32 bootfs                  536.9 MB   disk11s1
   2:                      Linux                         61.4 GB    disk11s2
最後の/dev/disk11が該当
・該当diskをunmountする
mountしたままではMacOSの配下にあって、キャッシュとかでまともにバックアップが取れないと
% diskutil unmountDisk /dev/disk11
でunmountする
・ddコマンドでバックアップイメージの作成
% sudo dd if=/dev/disk11 of=rasp5_chatbot.img bs=1m
でbackupが時間はかかる(おそらく30分近くかな)けど作成される
59024+0 records in
59024+0 records out
61891149824 bytes transferred in 1211.657719 secs (51079731 bytes/sec)
<復元>
復元時も同様にdisk番号取得してsdカードに書き込み(x)には取得したsdカードのdisk番号を入れる
% sudo dd if=rasp5_cahtbot.img of=/dev/disk(x) bs=1m
admin
WSGIやFlaskサーバーでサービスを再起動すると、なぜmDNSが再度実行されるかというとAvahi(mDNSのラズパイ実装)がサービスをモニターしていて、再起動されるとCache flushを実行して、結果としてクライアントは再びmDNSを実行するようです
<tcpdumpの実行ログ>
MacBookからtfliteサービスのリクエストを出した時のログ、一度Cache flushが発行されると、タイムアウト(TTL)するまでは発行されない
% sudo tcpdump -i en0 udp port 5353 and src host 192.168.1.19

Password:
tcpdump: verbose output suppressed, use -v[v]... for full protocol decode
listening on en0, link-type EN10MB (Ethernet), snapshot length 524288 bytes

(サービス立ち上げ後にクライアントから最初にリクエスト)
09:36:44.585023 IP 192.168.1.19.mdns > 224.0.0.251.mdns: 0*- [0q] 1/0/0 (Cache flush) A 192.168.1.19 (39)
09:36:44.585025 IP 192.168.1.19.mdns > 224.0.0.251.mdns: 0*- [0q] 1/0/0 (Cache flush) AAAA 240d:1a:896:8300:99fc:1d59:78ab:a156 (51)


(サービスの再起動後のリクエスト)
09:39:08.361077 IP 192.168.1.19.mdns > 224.0.0.251.mdns: 0*- [0q] 1/0/0 (Cache flush) AAAA 240d:1a:896:8300:99fc:1d59:78ab:a156 (51)
09:39:08.361545 IP 192.168.1.19.mdns > 224.0.0.251.mdns: 0*- [0q] 1/0/0 (Cache flush) A 192.168.1.19 (39)
Avahiはdaemonで動作しています
$ ps -aux|grep avahi
avahi        655  0.0  0.0   7696  2672 ?        Ss   09:25   0:00 avahi-daemon: running [rasp5.local]
Avahiがどのようなロジックで外部サービスの状態をモニターしているのかはソース読まないとわからないけど
https://github.com/avahi/avahi
READMEには
AVAHI SERVICE DISCOVERY SUITE
とあるから、mDNSの実装よりもこちらがメインのように思える
admin
従来のコードからの変更箇所、
# work on Flask server
# server will be activated only when client request is occured
#
#
from flask import Flask, jsonify
import cv2
import numpy as np
import tflite_runtime.interpreter as tflite
from picamera2 import Picamera2
from waitress import serve

app = Flask(__name__)

# モデル・ラベル初期化
interpreter = tflite.Interpreter(model_path="efficientdet_lite0.tflite", num_threads=4)
interpreter.allocate_tensors()
input_details = interpreter.get_input_details()
output_details = interpreter.get_output_details()
with open("coco_labels.txt", "r") as f:
    labels = [line.strip() for line in f.readlines()]

# カメラ初期化
picam2 = Picamera2()
picam2.preview_configuration.main.size = (640, 480)
picam2.preview_configuration.main.format = "RGB888"
picam2.preview_configuration.align()
picam2.configure("preview")
picam2.start()

def preprocess_image(image):
    resized = cv2.resize(image, (320, 320))
    resized = resized[:, :, [2, 1, 0]]  # BGR→RGB
    return np.expand_dims(resized, axis=0).astype(np.uint8)

def postprocess_results(boxes, scores, classes, count, image_shape, labels):
    detections = []
    for i in range(count):
        if scores[i] > 0.4:
            ymin, xmin, ymax, xmax = boxes[i]
            left, right, top, bottom = (
                int(xmin * image_shape[1]),
                int(xmax * image_shape[1]),
                int(ymin * image_shape[0]),
                int(ymax * image_shape[0])
            )
            detections.append({
                'box': [left, top, right, bottom],
                'class_id': int(classes[i]),
                'score': float(scores[i]),
                'label': labels[int(classes[i])] if int(classes[i]) < len(labels) else f"id:{int(classes[i])}"
            })
    return detections

def detect_once():
    frame = picam2.capture_array()
    input_data = preprocess_image(frame)
    interpreter.set_tensor(input_details[0]['index'], input_data)
    interpreter.invoke()
    boxes = interpreter.get_tensor(output_details[0]['index'])[0]
    classes = interpreter.get_tensor(output_details[1]['index'])[0]
    scores = interpreter.get_tensor(output_details[2]['index'])[0]
    count = int(interpreter.get_tensor(output_details[3]['index'])[0])
    detections = postprocess_results(boxes, scores, classes, count, frame.shape, labels)
    return detections

@app.route('/detect', methods=['GET'])
def detect_route():
    detections = detect_once()
    return jsonify(detections)

if __name__ == '__main__':
	# when you limit access only from the local machine, use a loopback address instead of 0.0.0.0
    #app.run(host='0.0.0.0', port=5000)
    serve(app, host='0.0.0.0', port=5000)
時間測定用のスクリプトは、
#
# test script for image detect function(tflite server)
#

import requests
import time

if __name__ == '__main__':
    time1 = time.time()
    result = requests.get('http://rasp5.local:5000/detect').json()
    time2 = time.time()
    print('func1: {:.3f} sec'.format(time2 - time1))
    # 'label'が'person'を含んでいるかを判定
    person_detected = any(item['label'] == 'person' for item in result)

    if person_detected:
        print("Person detected!")
    else:
        print("No person detected.")
測定結果、
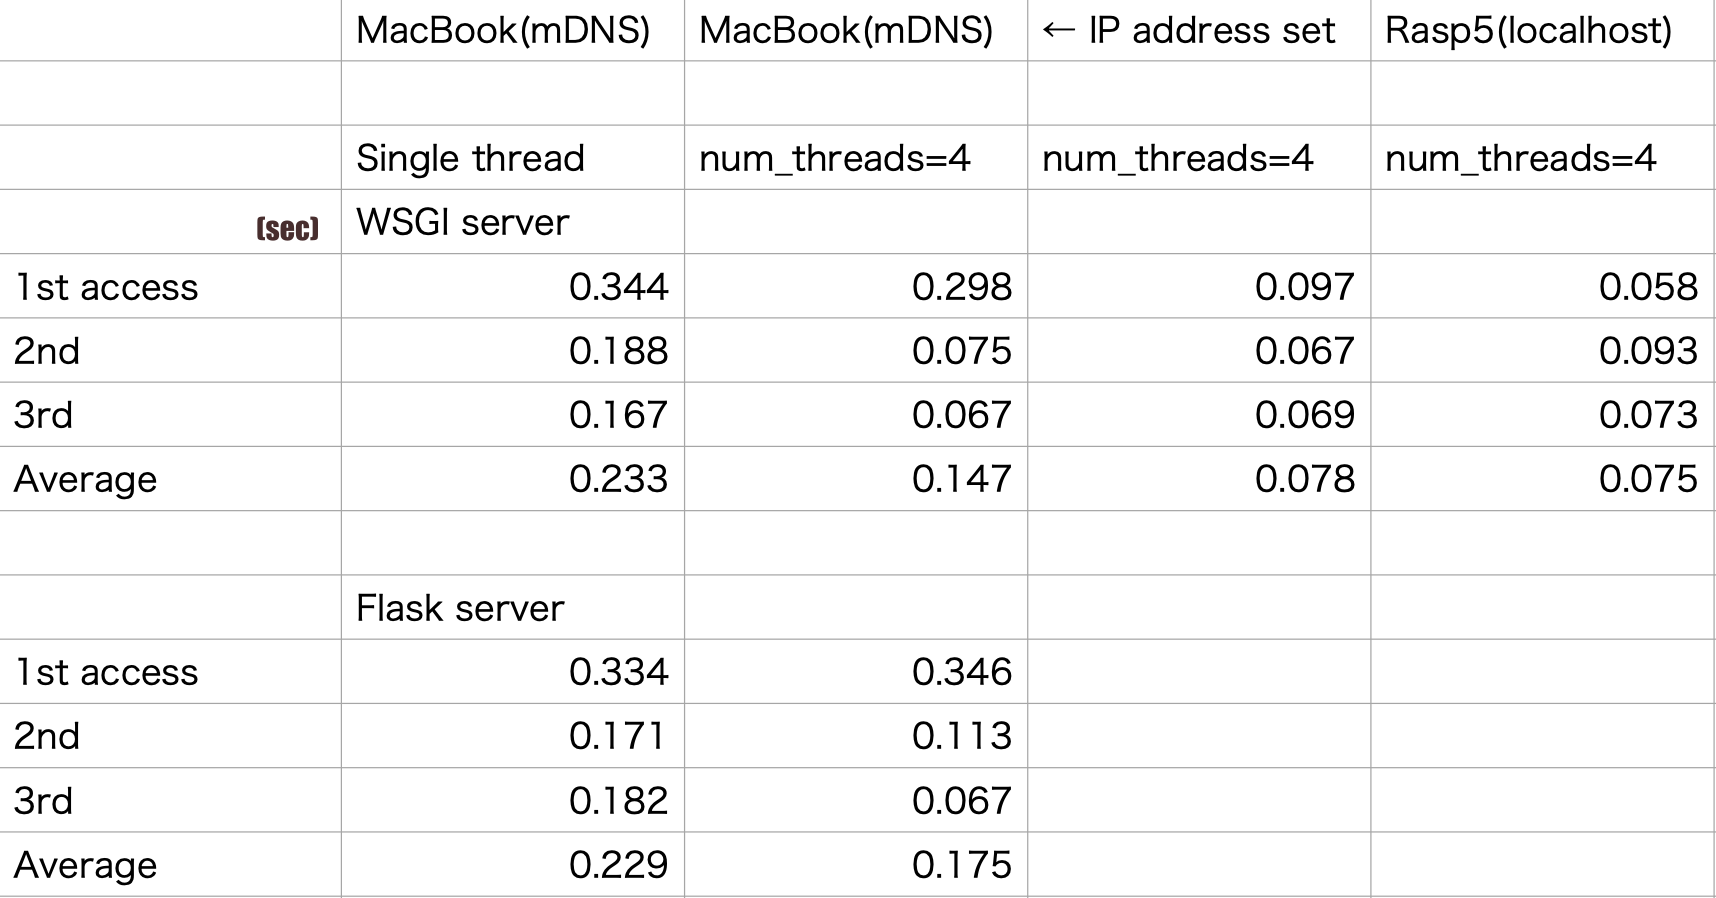
70m secぐらいでレスが返るということは、efficientdet_lite0.tfliteモデル使えばラズパイ5で十数フレームぐらいの動作は可能ということが言える
admin
一月末からほぼ100日プロジェクトでしたが、ようやく全ての機能を統合できました
具体的には、画像認識で人の認識を行う、音声認識と音声出力でLLMと会話する、カメラは眼球に仕込んで瞼の動きは状態(起動表示、レスポンス内容の喜怒哀楽)を返す手段とする、というところですが、LLMをラズパイ5のローカル動作は割と早めに断念してそこはクラウドを使用(API KEYはローカルのDifyへのアクセス用でGeminiのKEYは明には見えないようになっています)
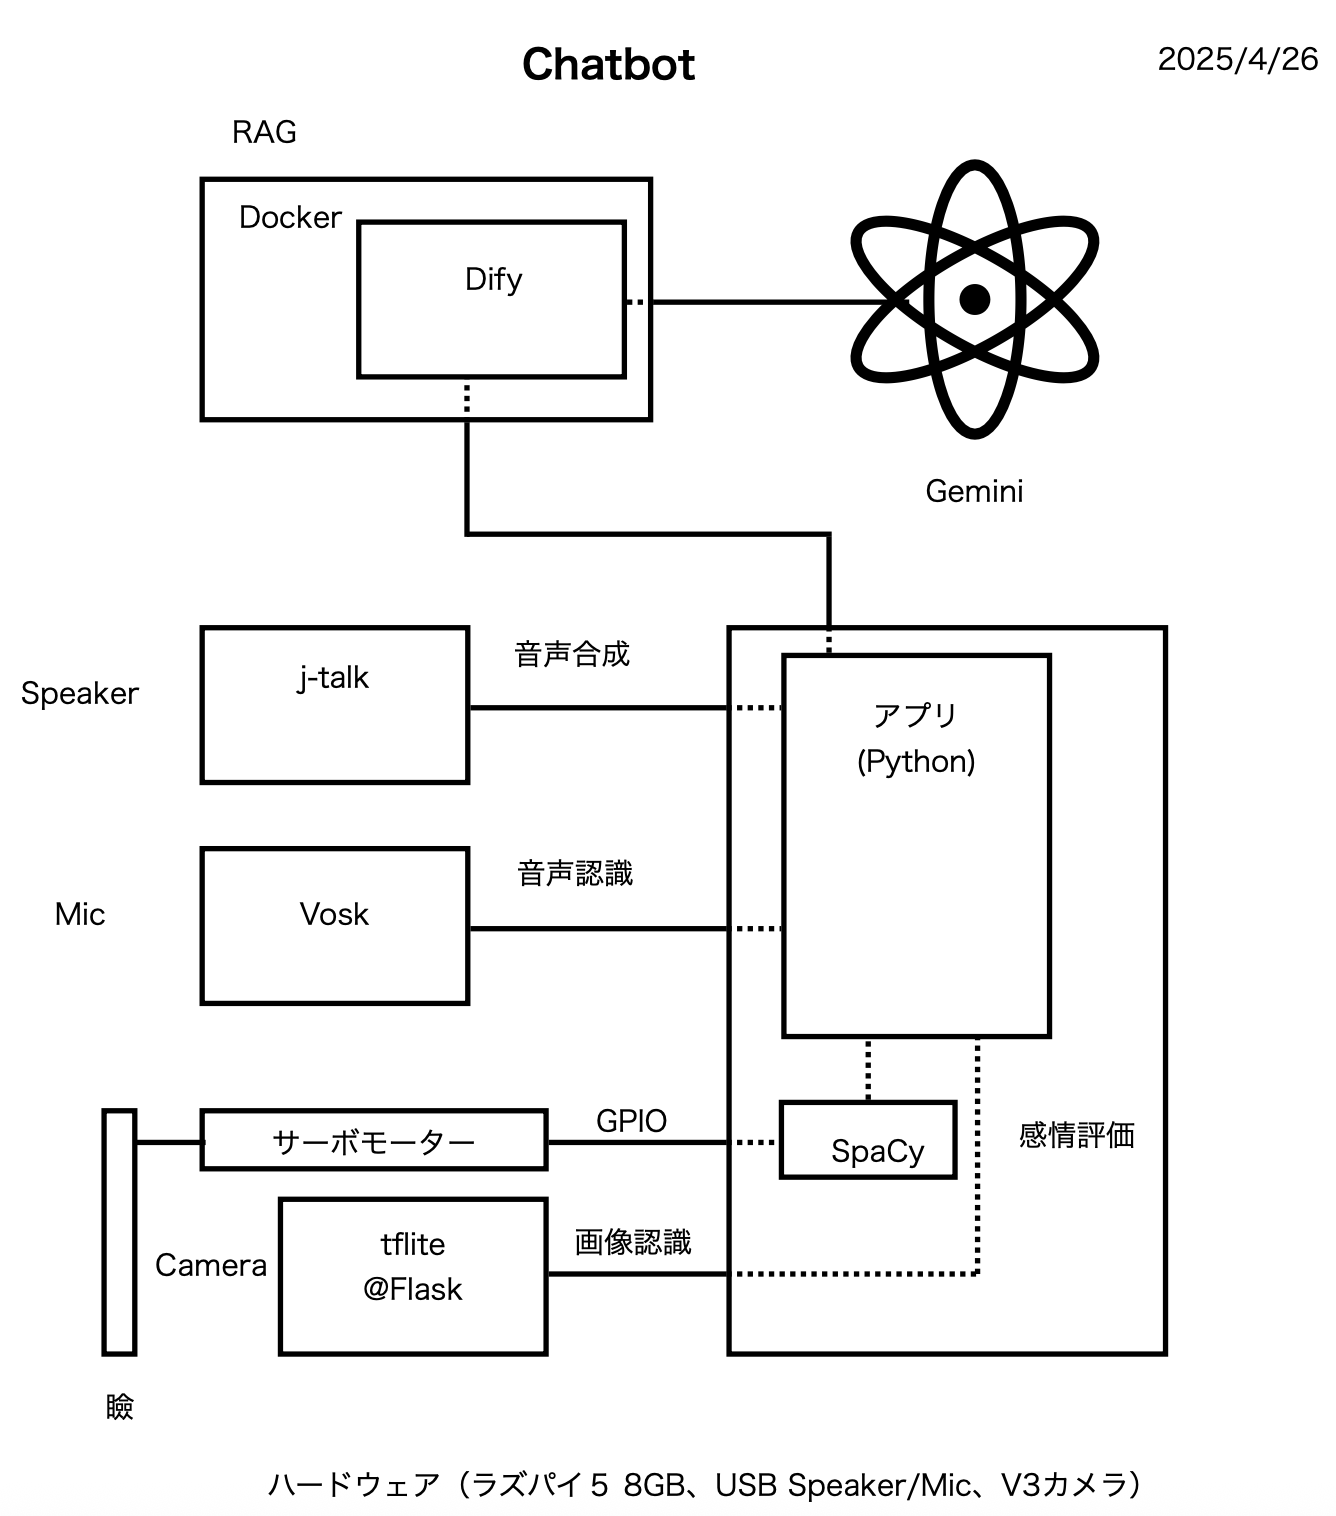
現状のコード等は以下のリンクに、
https://github.com/chateight/rasp5_bot
まだいくつかbuggyなところは残ってますが、追加機能の現状のアイディアとしては顔画像から表情を読み取ることですね
現状の機能としては、
① アプリが立ち上がったら音声メッセージを出す
② カメラが人(person)検出したらこれも音声メッセージを出して③に移行する
③ Dify経由でLLMとチャットモードで問い合わせのやり取りを行う
admin